FAQs
Licensing, Subscriptions and Legal Questions (7)
If I make a purchase, how long am I entitled to updates for?
For one year after purchase. After that, your subscription will be renewed automatically.
A one-year policy is standard in the WordPress plugins market, and allows us to have a sustainable business so that you can rely on WP-Optimize for years to come.
How many sites can I install WP-Optimize on?
The free edition of WP-Optimize can be installed on any number of single site installations.
When you purchase WP-Optimize Premium you can install onto any number (limited to the number of licences you purchase) of single or multisite WordPress installations.
What is your refund policy?
Software: We can consider refunds, at our discretion (i.e. no automatic right), based upon the particular circumstances of your case. In practice, we usually require that you have found a technical fault, and that we are given proper opportunity to verify sufficient information about any faults which you believe you have found (and that they are in WP-Optimize, not something else), and to fix them within a reasonable time period. These must in all circumstances be requested within 10 days of purchase, which we believe is sufficient time to ascertain that a purchase works.
Legalese: There are no automatic refunds for digitally-deliverable/non-tangible goods. This is standard practice in these industries, because such goods cannot be returned (unlike physical goods). It is your responsibility to read the product descriptions, verify that it meets your needs (i.e. it provides a workable solution for you) and is suitable for your product environment (e.g. that your web hosting company does not fail to meet an essential requirement). Please do not treat a purchase as trial-ware – we don’t want to push increased costs onto our genuine customers. EU customers have the legal right to a refund of digital goods which they have not yet downloaded, if requested within 14 days, and such requests will also be honoured.
For separately-purchased support services (i.e. not those bundled with software), for which you purchase support for a specific issue, if your support need turns out to be caused by a WP-Optimize defect, then we will refund you 100% of your purchase price for the support purchase.
No refunds are available for unused support purchases, or for any part of the price of a bundled software+support package (for refund purposes, those are treated as 100% software packages).
These restrictions do not affect your consumer rights. For example, if WP-Optimize’s product description states that it has a feature which in fact it does not have, then you can invoke your consumer rights.
Finally, we reserve the right to, without notice or refund, terminate any ongoing services (including support agreements or update feeds) to customers who abuse our facilities or staff.
How long will I have access to updates for?
Firstly: already-installed software can be used forever, whether you have access to updates or not.
With each purchase, access to personal support and updates to install/update to new releases of WP-Optimize is for 12 months. (As is the case with about 90% of the premium WordPress plugin market).
After 12 months, your license will be automatically renewed (subscription), granting you access to personal support and updates for other 12 months.
To repeat: if you prefer to cancel your subscription before the end of your billing period, then your installed software is unaffected – it will remain installed and you can carry on using it.
Information about Subscriptions
WP-Optimize Premium is purchased as a subscription. This means that your license will be renewed automatically (and a new order created) at the end of your billing period, unless the subscription is cancelled.
How often will I be billed?
Your account will be billed at the end of the current billing period. Currently, all subscriptions are billed annually.
How is payment taken for repeat orders?
Payment for repeat subscription payments will be processed automatically, using the same payment method.
Can I unsubscribe at any time?
Yes, you can cancel your subscription at any time from your account page.
Once cancelled, you will no longer be charged at the end of the billing period. Your licenses will expire at the end of the current billing period.
Can I be refunded if I stop using WP-Optimize before my subscription period ends?
All refunds are assessed on a case-by-case basis. Please see our refund policy for more information.
Can I upgrade my subscription?
Yes, WP-Optimize Premium subscriptions can be upgraded at any point of the billing period.
To upgrade, log into your account and make a fresh purchase of the package that you wish to upgrade to. Then, add the relevant upgrade coupon at checkout.
The purchase will be discounted by the cost of the original order
Below are the coupon codes when upgrading from a license subscription:
- fromstarter – upgrading from the 2-site Starter package
- frombusiness – upgrading from the 5-site Business package
- fromdeveloper – upgrading from the 20-site Developer package
- fromultra – upgrading from the 100-site Ultra package
What data do we send to Mailchimp?
We export data for all users who have an getwpo.com account (via a purchase or direct sign-up – you do not have one merely by using the free WP-Optimize plugin) into a Mailchimp account managed by our partner. (You can see details of the strict data processing agreement with our partner here).
Any campaign or multiple-recipient email that we send with Mailchimp goes to a list which is a defined subset of this data. The fields we import into our Mailchimp account are the full name (to allow personal addressing of emails), email address (so that the email can reach the recipient) and purchase history (so that we can create mail-outs that target the desired set of people, e.g. notifying of an important enhancement for a product you have bought, without mailing people who have not bought it).
Under the GDPR right to be forgotten, any user who requests to be forgotten will have their data deleted from our website, which in turn will be deleted automatically from Mailchimp.
Installation (3)
Does this plugin remove all its own data after the uninstall?
Yes, the plugin removes all settings and data once uninstalled.
How many sites can I install WP-Optimize on?
The free edition of WP-Optimize can be installed on any number of single site installations.
When you purchase WP-Optimize Premium you can install onto any number (limited to the number of licences you purchase) of single or multisite WordPress installations.
How to install the WP-Optimize plugin
Installing the WP-Optimize plugin is as easy as 1-2-3. Here’s a quick guide to get you started.
Table of contents:
Installing WP-Optimize free
In order to install the free version of the WP-Optimize plugin:
1. Log in to your WordPress admin dashboard.
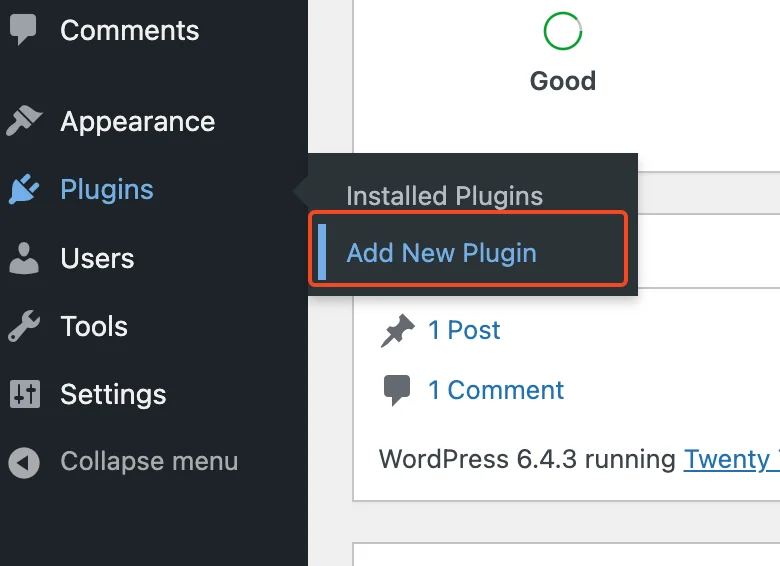
2. In the left-side menu bar, navigate to Plugins and click on Add New Plugin.
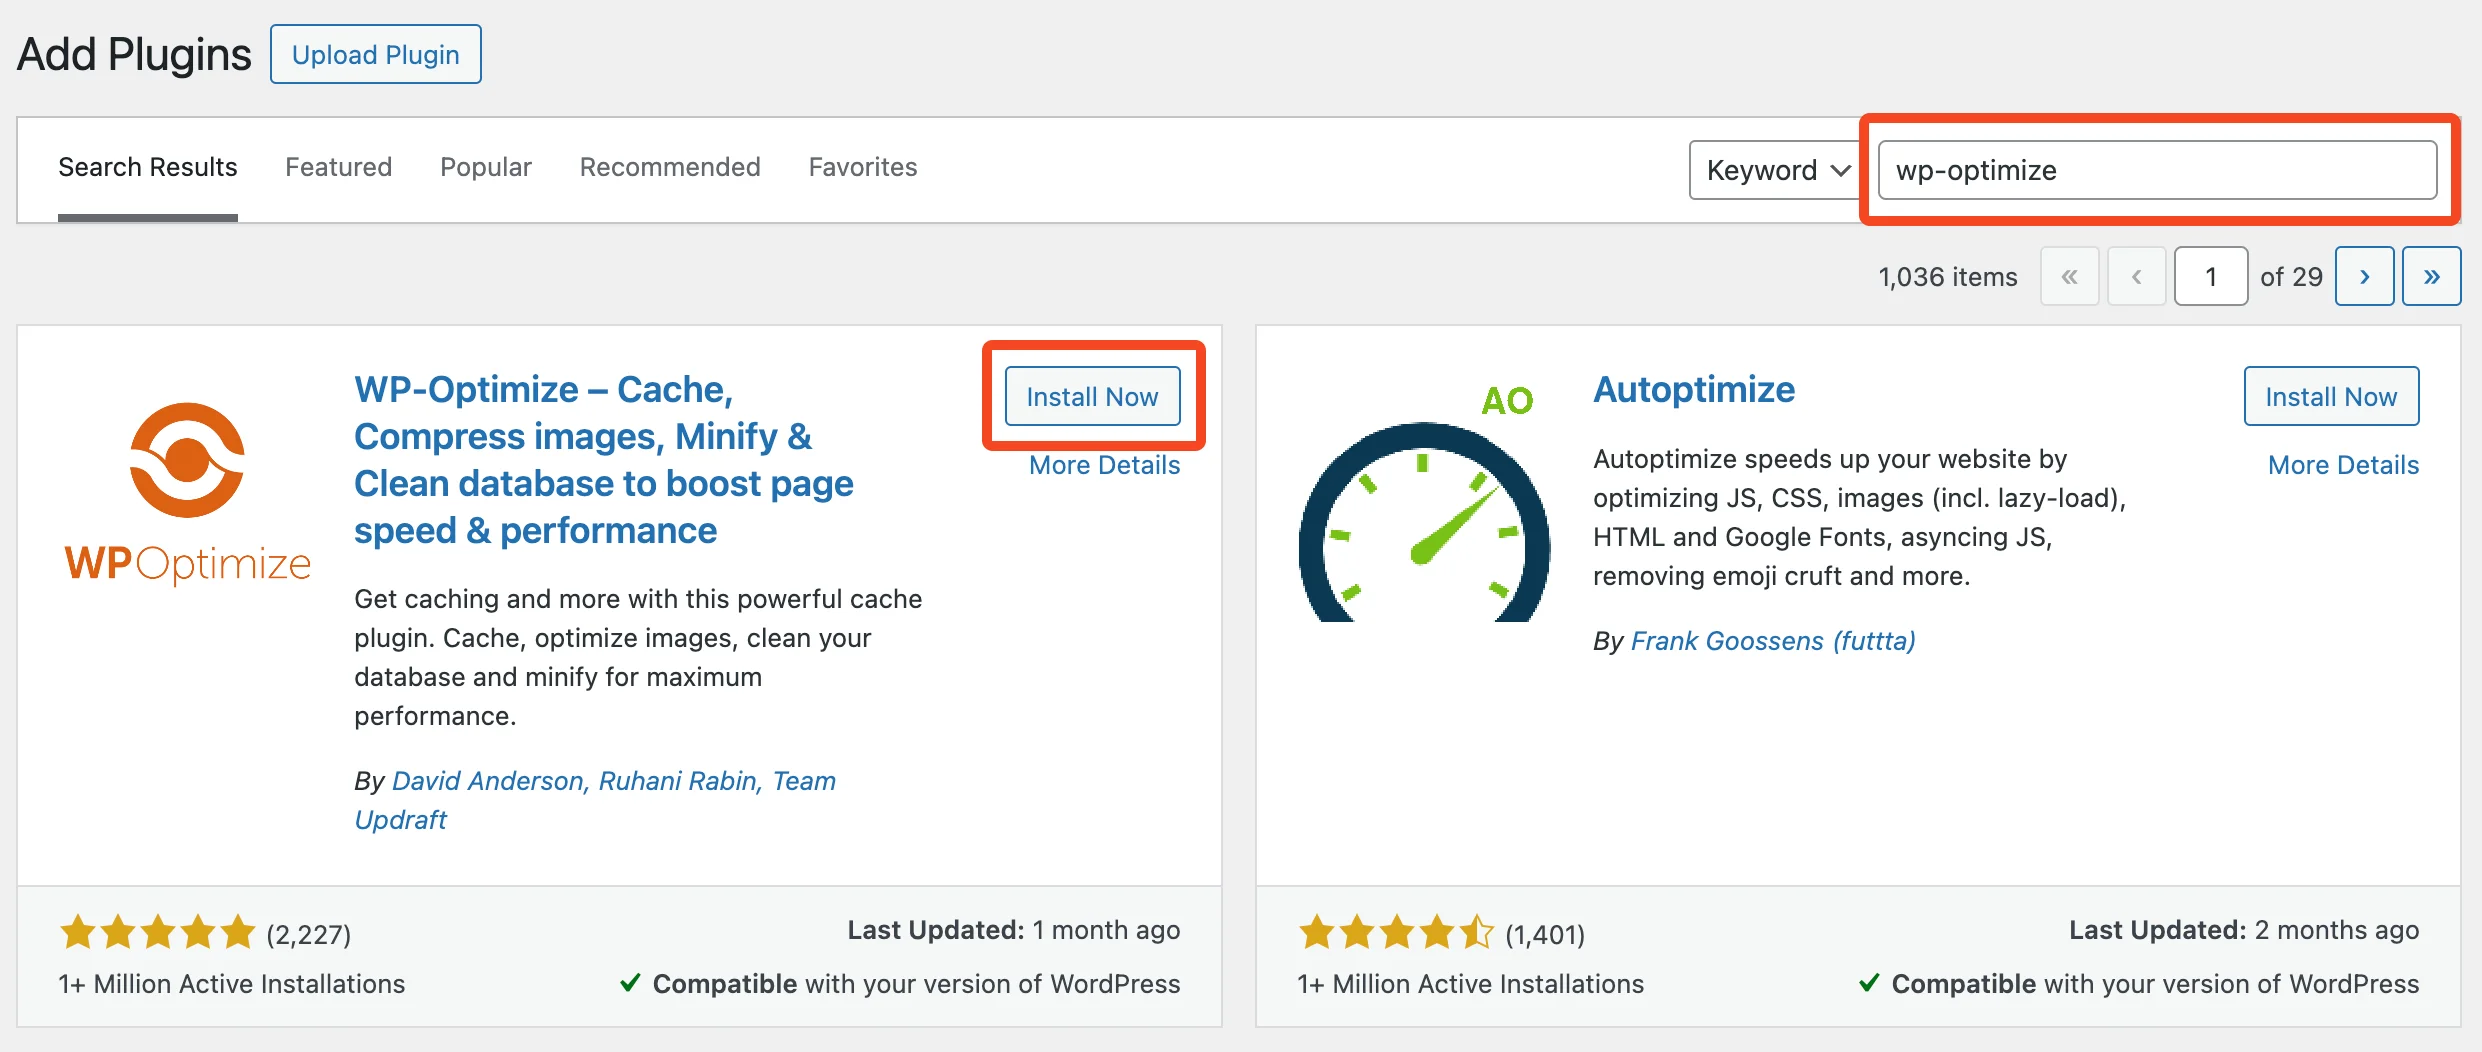
3. Search for ‘WP-Optimize’ using the search bar on the top right corner of your screen.
4. Look for the WP-Optimize plugin and click Install Now.
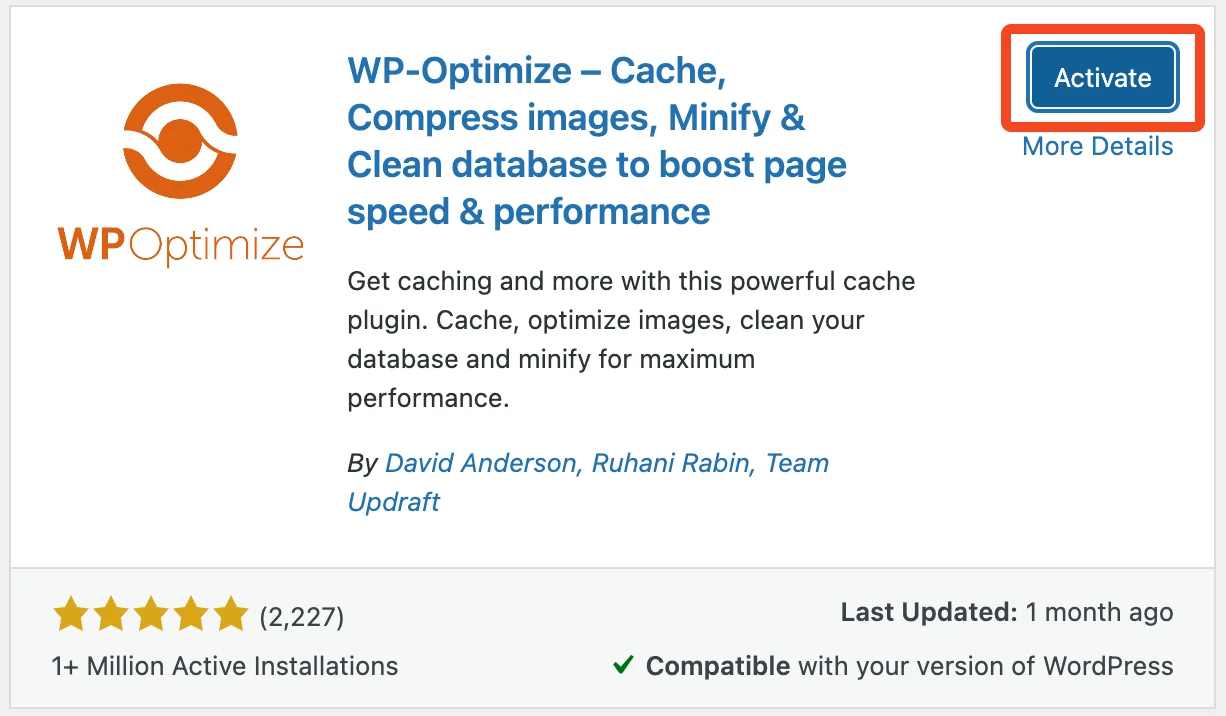
5. Once the installation is completed, click on the Activate button to activate the plugin.
Once you have installed and activated the free version of WP-Optimize, you can learn how to set it up and for current and future use in just a minute or so. By setting up and carrying out these tasks, it can help your site to improve its speed and ranking score, as slow sites will suffer badly in search engine rankings if they are not routinely optimized.
Just follow the simple instructions in the below video to help continually optimize your site’s databases, images, caching and minify settings using the free version of WP-Optimize.
Installing WP-Optimize Premium
If you already have the free version of WP-Optimize installed on your website, you don’t need to worry about anything as it will be automatically deactivated.
You also don’t have to install the free version to run WP-Optimize Premium.
To download and install WP-Optimize Premium on your WordPress site, just simply:
1. Go to our website to buy the WP-Optimize Premium plugin.
2. Download the WP-Optimize Premium from the link in your confirmation email or from your Account page.
3. Log in to your WP admin dashboard, then go to Plugins > Add New Plugin.
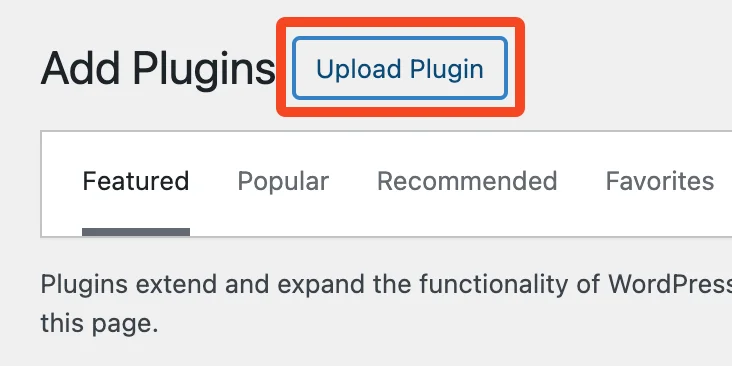
4. Press the Upload Plugin button near the title at the top of the page.
5. Click on Choose file and select the WP-Optimize Premium plugin file that you downloaded.

6. Upload and install the plugin by clicking on the Install Now button.

7. Click on Activate Plugin to activate WP-Optimize Premium.
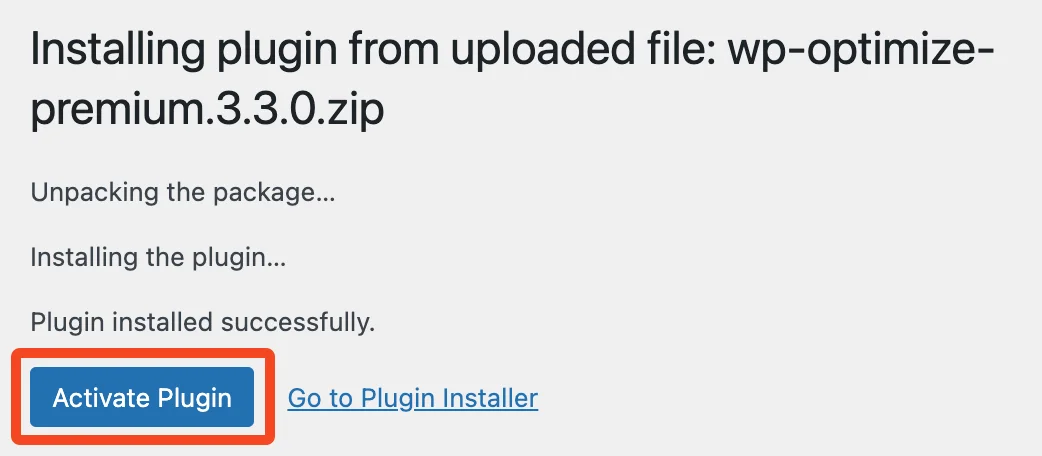
You’ll be prompted to enter your WP-Optimize credentials to link your site to licences. This will verify your purchase and enable the plugin to receive automatic updates. Enter the required details and click Connect.

Have questions?
Feel free to address any doubts regarding the purchase by submitting a pre-sale question. We are here to assist you at every step of your journey.
You can also refer to our FAQs page for assistance with any issues or inquiries that may arise.
Still haven’t found the information you need? Premium customers can get help from our expert developers through the Customer Support Form. We answer 94% of inquiries within 24 hours!
Optimization Questions (11)
How can WP-Optimize help you?
- Every time you save a new post or page, WordPress creates a revision of that post or page. If you edit a post 6 times you might have 5 copies of that post as revisions. Imagine if your posts or pages are long and big. It’s a huge number of bytes that is on your MySQL overhead. Now WP-Optimize allows you to optimize and shrink your posts table by removing unnecessary post revisions from the database. As example, if you have a post which is approximately 100KB data and you have 5 revisions of that post, the total space wasted is about 500KB. And if you have 100 posts similar to it, you might have 50MB database space wasted.
- Similar to the scenario described above, there might be thousands of spam and un-approved comments in your comments table, WP-Optimize can clean and remove those in a single click.
- WP-Optimize reports which database tables have overhead and wasted space. It also allows you to shrink and get rid of that wasted space.
Can you help me restore my database?
I’m afraid that this is not possible. Please ensure that you make a backup of your entire database before using WP-Optimize for the first time, and when you upgrade to a major new version of it. We recommend UpdraftPlus.
Why we don’t Optimize InnoDB Tables
The process for optimizing InnoDB tables before MySQL version 5.7 is, at default, ineffective as it essentially rebuilds the entire table. However MySQL version 5.7 or greater or MariaDB is fine as this is resolved and not affected. We know some hosting companies have a configuration that will allow for correct optimization before 5.7 but that’s few and far between. However, we have implemented an override option for the user as long as they are aware of the risks.
What is/are wp_commentmeta, wp_postmeta and all the other tables mentioned in the Table information tab?
These are the database tables in your WordPress install… To find out more see the WordPress codex here: https://codex.wordpress.org/Database_Description
How often should I perform Optimization?
This is very difficult to say as every site is different… Keep an eye on the Table Information tab and you will see how the data usage grows over time. Select an appropriate schedule based on your own site. There is no one size fits all in the is case.
What savings can I expect to make?
This is a “how long is string?” sort of question. It depends completely on your site – how big it is, how many users interact on it, how long it has been running, and when you last optimised it. However, the savings and speed-ups can be substantial; it is always worth making sure that your database is optimized.
What does Optimizing mean?
Over time your WordPress database accumulates extra data such as revisions and spam comments and many more.
Removing this unnecessary data from the database will help reduce your database size and speed up your site.
The process of optimization is the removal of these unwanted/old database entries and the reorganising of the remaining data and associated indexes.
What is Lazy Loading?
Lazy loading is the technique of only loading parts of a web-page when it is visible to the user.
The parts, usually images or videos, are replaced by placeholder elements until they are needed.
The advantage of lazy loading is that the initial page load is much faster. Rather than waiting for everything on the page to load, the user can start viewing visible content quickly.
WP-Optimize gives a simple and easy method to set your images and videos to lazy load.
To Enable:
- Open the WP-Optimize Images tab
- Open the Lazy Load Images sub-tab
- From here, you can enable lazy loading for both Images and Videos/Iframes
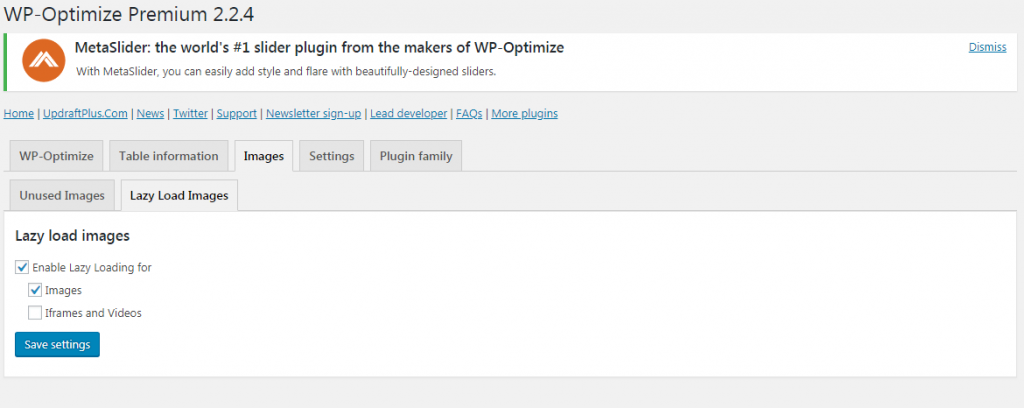
If you need to disable lazy loading for certain images, videos or iframes just add no-lazy class to the specific HTML element.
How do I use WP-Optimize Database Cleaning?
For a detailed walk-through on how to use the WP-Optimize Database Cleaning feature, we put together a video that takes you through all the necessary steps:
How to increase overall website speed with the WP-Optimize plugin
For detailed written instructions, please follow this link
What is Optimization Preview
Optimization Preview gives WP-Optimize Premium users the ability to preview, select and remove data and records available for optimization from the database. This preview process lets the user check the relevant data before running the optimization, which helps avoid mistakes such as removing potentially useful information.
To View:
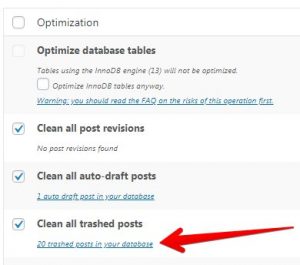
- Open the WP-Optimize tab
- View the preview information (see arrow below) on what files are available to be optimized or deleted
Troubleshooting (7)
How do I stop transient options from coming back automatically each time I clear them?
WordPress creates transient options automatically; it’s difficult to stop it from doing so. The best way to override this is to clear the transient options on a scheduled basis. For example, WordPress may create 50 transient options in a week. If you schedule WP-Optimize to clear these options on a weekly basis, you’ll have far fewer building up.
WP-Optimize does not make large savings on my database
This is rare; it’s probably because you’re with a shared web hosting company that doesn’t allow scripts to run an optimize command via SQL statements (SQL “OPTIMIZE” instruction). Please consult your web hosting company on this matter.
Table size is displayed incorrectly / Not optimizing
Please check your database for corrupted tables. That can happen, usually your web hosting company can run the repair command on the db.
Are there any bugs?
WP-Optimize is always undergoing improvements and developments and is therefore always considered ongoing work; it is impossible to rule out unforeseen situations and bugs. So we would recommend you to test WP-Optimize out on your local system and always make a backup of your database
How can I get WebP conversion tools to work?
If you receive a message saying “No WebP conversion tools are available on your web-server”, instead of a checkbox option to enable WebP conversion, there are two possible explanations:
- PHP extensions such as ‘gd’, ‘imagemagick’, ‘imagick’, ‘graphicsmagick’, ‘gmagick’, ‘vips’, ‘ffmpeg’, ‘wpc’, ‘ewww’ are not installed on your server. Please ask your hosting provider to install one or more of these, so you can use the WebP conversion feature.
- Your hosting provider may have disabled shell functions such as escapeshellarg, exec, shell_exec, etc. Again, please ask your hosting provider to install one or more of the above in order to use the WebP conversion feature.
The scheduler in my WordPress installation is not working – what should I do?
WordPress has a system for running scheduled tasks in the background. This does lots of useful things – things like clearing up internals (theent equivalent of taking out the garbage), checking for available updates, and performing actions that plugins want doing at a set time, or regularly (like optimizations!).
If you have received a notice that your WordPress scheduler does not seem to be running tasks, then this page is for you.
Firstly, if nobody has visited your site for a while, then this situation is expected. WordPress only gets the opportunity to do things when people visit pages. No pages = WordPress is never called upon = WordPress cannot kick off any background tasks. So, if your site is a development site, or has been moth-balled for some other reason, then this message is not surprising. Visit a few pages, and the message should go away. If not…
What can cause this problem?
1. Maintenance mode?
Firstly: is your website in maintenance mode? This disables scheduled tasks of all kinds – so turn it off first.
2. No visitors?
WordPress’s scheduler relies on the site having visitors. No visitors means that WordPress doesn’t run, and therefore can’t hand over to the scheduled task. If your site is in development, and you schedule a backup run for a time when all the developers are asleep, then that may be the cause for the scheduled task not running.
3. Is your scheduler explicitly disabled?
Perhaps your site has WordPress’s scheduler disabled in the configuration. To check manually, look for a line like this in your wp-config.php file (which is found in the root directory of your WordPress install), and remove it (or change true to false, making sure there are no quote marks around false):
define('DISABLE_WP_CRON', true);
In this case, the disabling may be something your web hosting company did intentionally, so be aware that they may re-disable it. Or, it may be something that you did intentionally, and you may have set another means of calling WordPress’s scheduler system, perhaps via your web hosting company’s control panel. In that case, the message about DISABLE_WP_CRON is to be expected – but note that it is then your responsibility to make sure that the scheduler is called frequently enough to process all the jobs scheduled on your site. No optimizations will run until the time that you have set the scheduler system to be called.
Also – note that it’s possible for DISABLE_WP_CRON to be set in a file other than wp-config.php; wp-config.php is simply the most likely (99%) place. If you have a warning about DISABLE_WP_CRON, but it is not found in wp-config.php, then it will be somewhere else – you will need to hunt for it.
4. Loopback connections are not working?
Some web hosting providers (one big one: Heart Internet) purposefully (though for no good reason) disable the “loop-back” connects that allows WordPress to run its scheduler. This is also the case if your website is password-protected. If loopback connections are not working (whether deliberately disabled or not), you can try this use WordPress’s alternative scheduling system – instructions here. The instructions amount to one thing: add a line anywhere in the middle of your wp-config.php file as follows (don’t add it too late in the file, or it will take no effect):
define('ALTERNATE_WP_CRON', true);
5. Try using a cron job
If your web hosting company gives you “shell” access and you can set up cron jobs, and if you are confident/skilled enough to use that, then that’s a great solution. Jobs run that way won’t face any time-out issues imposed by the webserver. Read more about running via the shell here.
6. Is your entire website password-protected?
Another cause is if your entire website is password-protected at the HTTP level (e.g. via a .htaccess file). This also prevents WordPress’s scheduler from working. You should configure your webserver to allow “loop-back” connections (i.e. connections to self), otherwise you WordPress scheduler and everything that depends upon it will be broken. If you are using Apache and .htaccess, then adding these two lines to the access control section of your .htaccess should work – after replacing a.b.c.d with your website’s IP address):
Allow from a.b.c.d
Satisfy Any
Please note: The above suggestion is just a suggestion. .htaccess configuration is a very big subject. WP-Optimize neither “supports” nor “doesn’t support” different .htaccess configurations, because .htaccess files operate at quite a different level to WordPress plugins. If you enter the correct instructions in your .htaccess file to permit access, then WP-Optimize will work. But if you are not sure of the correct instructions for your particular server, then you need to consult with either your web-hosting company or your local .htaccess guru.
7. Still no good?
If the scheduler’s brokenness remains and is not caused by one of the above reasons, then the problem is almost certainly with your web hosting provider. If the alternative scheduler also fails, then you need to either contact your web hosting company for support (ask them if loopback connections work, and if not, if they can enable them); or failing that find a different web hosting company. If they confirm that loopback connections are disabled and say that it is necessary for security, then this is nonsense. (A website connecting to itself can do nothing more or less than anything else connecting to the website can). In such a case, you will need to find a new hosting company in order to use any scheduled task (including WP-Optimize) within WordPress (if you want UK-based hosting, then you could consider Simba Hosting – excellent WordPress support, a 1-click installer, and will give you a 20% discount if you mention this article at sign-up time).
How do I get support?
In our support forum, here: https://wordpress.org/support/plugin/wp-optimize/
Pre-sales Questions (9)
How can WP-Optimize help you?
- Every time you save a new post or page, WordPress creates a revision of that post or page. If you edit a post 6 times you might have 5 copies of that post as revisions. Imagine if your posts or pages are long and big. It’s a huge number of bytes that is on your MySQL overhead. Now WP-Optimize allows you to optimize and shrink your posts table by removing unnecessary post revisions from the database. As example, if you have a post which is approximately 100KB data and you have 5 revisions of that post, the total space wasted is about 500KB. And if you have 100 posts similar to it, you might have 50MB database space wasted.
- Similar to the scenario described above, there might be thousands of spam and un-approved comments in your comments table, WP-Optimize can clean and remove those in a single click.
- WP-Optimize reports which database tables have overhead and wasted space. It also allows you to shrink and get rid of that wasted space.
Is the plugin tried and tested?
Yes – WP-Optimize is WordPress’s #1 most-installed optimization plugin, with over 500,000 users and a pedigree going back over 7 years.
Can you help me restore my database?
I’m afraid that this is not possible. Please ensure that you make a backup of your entire database before using WP-Optimize for the first time, and when you upgrade to a major new version of it. We recommend UpdraftPlus.
If I make a purchase, how long am I entitled to updates for?
For one year after purchase. After that, your subscription will be renewed automatically.
A one-year policy is standard in the WordPress plugins market, and allows us to have a sustainable business so that you can rely on WP-Optimize for years to come.
How can I purchase improvements for WP-Optimize?
The base WP-Optimize plugin is free, and fully functional (it is not “crippleware” that hamstrings you unless you pay). If you want extra features, then you can buy WP-Optimize Premium, which includes all additional functionalities, plus upgrades and support for one year. If you choose Premium, you can get it conveniently and easily in our shop.
Are there any bugs?
WP-Optimize is always undergoing improvements and developments and is therefore always considered ongoing work; it is impossible to rule out unforeseen situations and bugs. So we would recommend you to test WP-Optimize out on your local system and always make a backup of your database
Is this plugin compatible with multisite?
Yes. If you have a WordPress Multisite install (and you’ll know if you do – it’s fiddly to set up), then you need WP-Optimize Premium. If an optimization plugin has not been particularly written for WordPress Network usage, then it will be insecure – it will allow every blog admin on the network to do operations on the entire network. With our WP-Optimize Premium, only “super admin” will have access to optimization operations.
Can I upgrade my subscription?
Yes, WP-Optimize Premium subscriptions can be upgraded at any point of the billing period.
To upgrade, log into your account and make a fresh purchase of the package that you wish to upgrade to. Then, add the relevant upgrade coupon at checkout.
The purchase will be discounted by the cost of the original order
Below are the coupon codes when upgrading from a license subscription:
- fromstarter – upgrading from the 2-site Starter package
- frombusiness – upgrading from the 5-site Business package
- fromdeveloper – upgrading from the 20-site Developer package
- fromultra – upgrading from the 100-site Ultra package
What happens if a cart is abandoned?
If a cart is abandoned after the contact has entered their email address but not completed the payment, we may contact them via email during a short period afterwards to remind them to complete the checkout, unless they opt-out. This is under the GDPR provision for marketing for legitimate interests, based on the expression of interest in purchasing.
General Usage (6)
Is optimizing my database safe?
Yes; optimizing is perfectly normal and safe. WordPress Optimize does not use any trickery or undocumented dangerous processes.
WordPress Optimize uses database clean-up scripts with well-defined, common MySQL commands. Nevertheless, we always recommend backups, which cover every possibility; not just database malfunctions, but hackers, human errors, etc.
How do I run WP-Optimize?
WP Admin Panel » WP-Optimize
- Click the ‘Run Optimization’ button to run any single optimization
- Check any number of optimization tasks and click ‘Run All Selected Optimization’
- View Table Information to see the record count and size for your tables
- View the settings tab to change the way WordPress Optimize will work and to schedule future (one off or regular) optimization tasks
How can I change the settings?
WP Admin Panel » WP-Optimize » settings tab
I want to schedule my optimizations to run at 3am (GMT) what do I do?
The scheduler uses the time zone set by the admin of your WordPress install so just refer to that and ensure it is correct for your time zone and make the appropriate adjustment.
Unused Images
How it works
WordPress stores images in two parts:
- The image files are stored on the server, typically in the ‘wp-content/uploads’ directory of the site.
- A record of the image is then stored in the database, in the Media Library. This record also includes other data related to the image, such as the image tile, description or alt-text.
Images in the Media Library are also stored in different sizes, with a separate image file on the server for each size (typically thumbnail/small/medium/large). This can cause the uploads folder to become bloated with unused image files.
When populating the list of unused images, you can use WP-Optimize Premium to check both these locations for images
WP-Optimize will then scan the database for each of the detected images. This includes checking any posts, pages and custom post types (such as FAQs or eCommerce products) for featured or embedded images. Any image that can’t be matched to a record in the database will then be added to the list of unused images.
Please note that certain themes or page-builders may access images in a non-standard manner, in which case the images may be flagged as unused incorrectly. We recommend double checking before deletion if you are unsure, and keep an up-to-date backup of the site.
When removing an image, both the image files and Media Library record will be deleted.
Removing Unused Images
Open the ‘Images’ tab in the WP-Optimize admin page and press the “Unused images and sizes” tab.
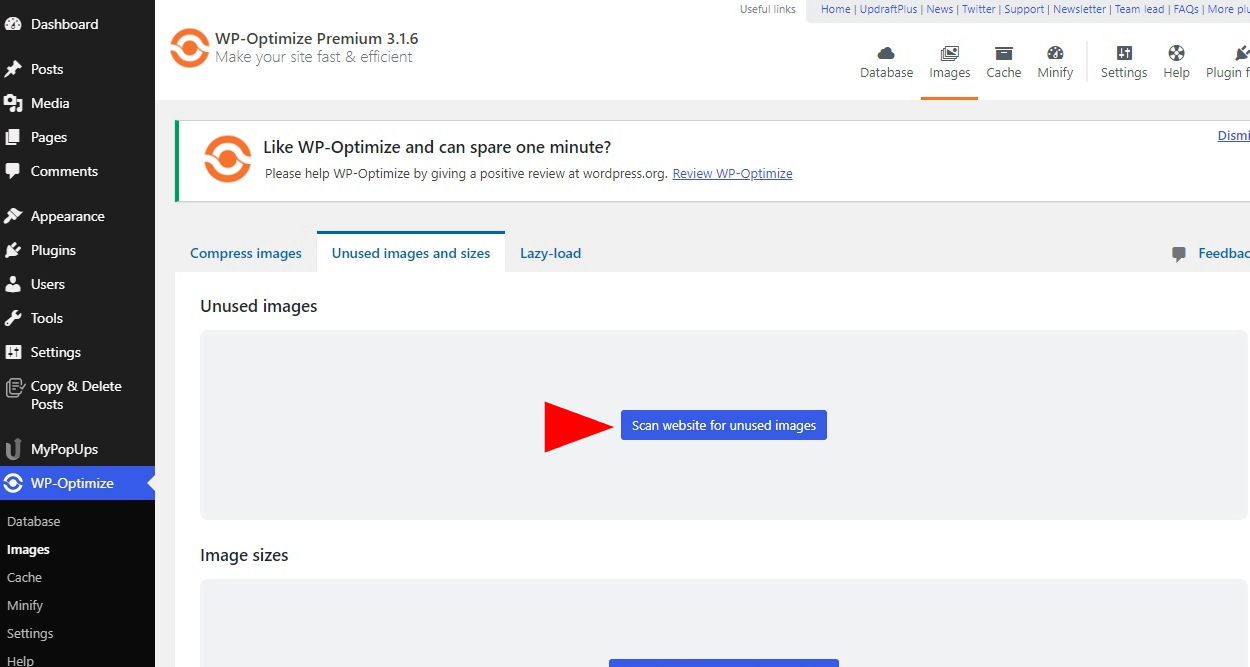
To scan your website for unused images, press the “Scan website for unused images” button. WP-Optimize will now scan for unused image files, found both in the Media Library and the ‘wp-content/uploads’ directory, that are not attached or embedded in any posts or pages.
You will now be presented with all the unused images that are on your site. To delete these images, either individually select the images by clicking on the images to highlight them, or press the “Select all” button to delete all unused images.
Once you have selected all the unused images you want to delete from your site, scroll down and either choose “Move selected images to trash” or “Delete the selection permanently”. WP-Optimise will then delete all copies of the selected image file plus any record in the Media Library.
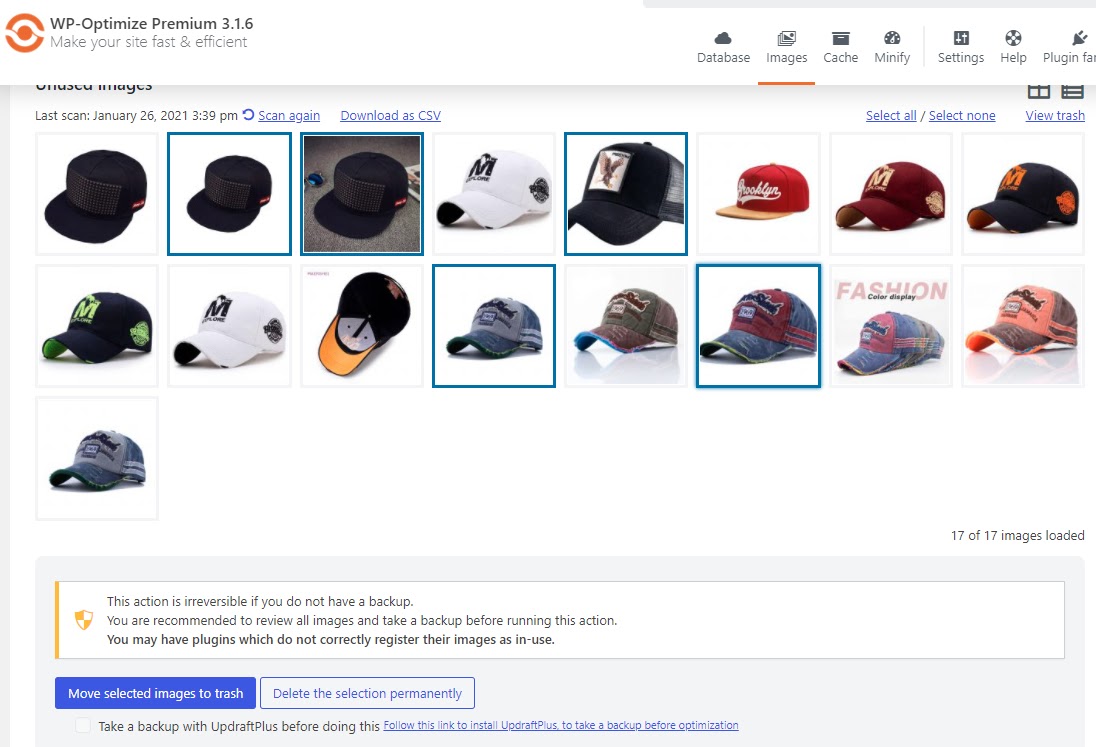
You will receive a notification that your images have now been deleted.
Removing Images by size
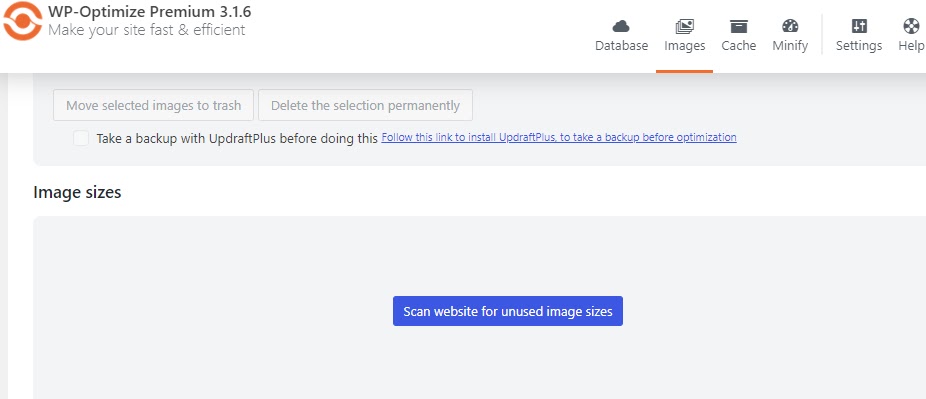
By default, WordPress creates 3 sizes for every uploaded image. Not all image sizes are used. And so this Premium feature allows you to see a list of all registered image sizes, as well as registered image sizes not in use, which can then be removed. Just press ‘Scan website for unused image sizes’ to see a list of results.
Restoring images that were moved to trash
If you are not sure if you might still need the image, you can send it to trash, instead of deleting it permanently. You can view and restore these images by pressing the “view trash” button.
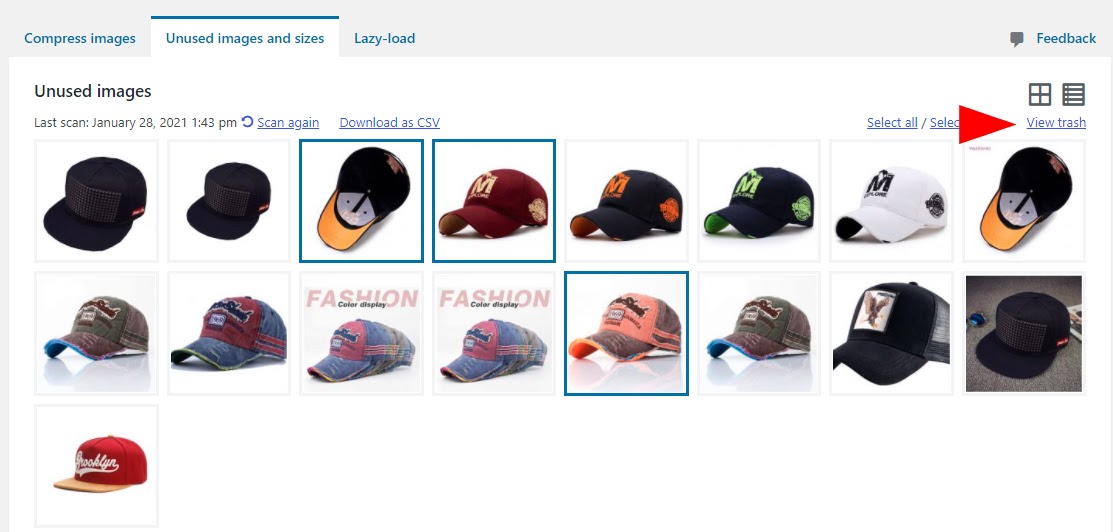
Here you can restore any trashed images you want to keep by highlighting them and pressing the “Restore the selection” button. These images will now be sent back to your image library.
We recommend taking a backup of the site before performing any optimisation with WP-Optimize. WP-Optimize integrates with our backup plugin, UpdraftPlus. If UpdraftPlus is active on the site, the option to take an automatic backup before images are removed will be displayed in the tab.
What commands to control WP-Optimize can I run with WP-CLI?
We’ve put together all the information here – https://getwpo.com/new-command-line-feature-for-wp-optimize/
Image Compression (21)
How does the optimisation process work?
The image optimisation process is performed on 3rd party servers using the WordPress HTTP API. Once compressed, WPO retrieves the optimised image and stores it on your site.
What kind of images can be compressed ?
Our API limits its use to PNG, JPG, GIF, BMP and TIF pictures up to 5MB in size.
What tools do you use to compress the images?
PNGQuant – to strip unneeded chunks from PNGs. PNGQuant is a lossy compression library for PNG images. This library preserves a full alpha transparency.
JPEGOptim – provides lossless optimisation it is one of the most efficient library for JPG conversion among JpegTrans, mozjpeg and jpegrescan.
OptiPNG It’s a PNG reducer that’s used by lot of online optimisers.
What is EXIF ? Can my EXIF data be preserved ?
Digital cameras embed technical metadata, called EXIF (Exchangeable image file format) data, into image files. WP-O by default removes this data, it can be preserved by changing the settings in the options menu.
What is Lossy Compression?
Lossy compression refers to compression in which some of the data from the original file (JPEG) is lost. The process is irreversible, once you convert to lossy, you can’t go back. And the more you compress it, the more degradation occurs. JPEGs and GIFs are both lossy image formats.
One of the biggest benefits to using lossy compression is that it results in a significantly reduced file size (smaller than lossless compression method), but it also means there is a slight quality loss. This loss in most cases is tiny and can’t even be noticed.
Why is my uploads folder so big after optimizing?
Once you have optimised your images, you will notice that your uploads folder will increase in size. This is due to the “backup original images” option that we provide. This option preserves the original unoptimised copy of your image, in case you feel you want to go back and start again from scratch or just want to keep an original copy of your image online. While this could double the size of your uploads folder, it provides a simple backup solution for your original media files. However, you can also turn this off at any time should you wish to save space.
Will the optimised images remain on my site if I uninstall the plugin?
Yes, they will. The plugin simply replaces the image files on your sites with the ones optimised by us.
What is auto compress ? How does it work ?
During the process of uploading images to the media library, the plugin simultaneously sends the images to one of the API servers, where the incoming material is processed and sent back in optimised form. Afterwards, the plugin saves the image version with a reduced file size in the media library. The image can be reverted to the original if needed.
The optimization of images – including thumbnails – is conducted in the background and outside of the view of the user.
Google Pagespeed says the images need more compression
PageSpeed Insights uses lossy compression instead of lossless. That means PageSpeed reduces the quality of your images in order to achieve the results they recommend. Instead of lossless compression, PageSpeed uses the freely available ImageMagick utility at quality 85 to compress images.
We use a slightly better setting to compress images and PageSpeed may think this is inadequate. You can manually set the compression level to Custom and select the maximum compression to ensure that PageSpeed does not flag your images.
How do I use the image optimisation feature
For users who would like clear instruction on how to use this feature, we created a short video that takes you through the step-by-step process of optimizing any or all existing and future images.
What technology do we use to compress the image?
We know that everyone has their favourite kid of images to work with, which is why WP-O allows you to optimise NG, JPG, GIF, BMP and TIF pictures up to 5MB in size. We use the latest cutting edge technology to compress your images, including PNGQuant (to strip unneeded chunks from PNGs), JPEGOptim (to provide lossless optimization) and OptiPNG (as a PNG reducer).
What will happen to my images if I delete the plugin?
Should you wish to uninstall the plugin, you can rest easy in the knowledge that all the images you compressed will be unaffected and will remain on your site. WP-O optimizes and replaces the images but does not host them, allowing you to maintain full control over your content.
Why is the gain from compression so low for some images?
Since WP-O only employs lossless image optimization by default, the optimization value depends on the amount of (unnecessary) metadata saved in the image and the composition of the image itself. The more metadata can be removed from an image, the higher the reduction that can be achieved through optimization.
How much will I save by compressing my images?
While there is no definitive and exact figure for how much data you will save by optimizing your images using Lossy or Lossless compression, the following examples should serve as a good guide.
To test out the kind of results that could be achieved, the same image was compressed using both the Lossy and Lossless method. The results are as follows:
With Lossy compression enabled, the sample image was compressed from 230.26 KB to 64.92 KB, giving an almost 75% reduction in size.
With Lossless compression enabled, the sample image was compressed from 230.26 KB to 172.18 KB, giving just over 25% reduction in size.
For more detail on the compression process and the results achieved, take a look at the “Lossy vs Lossless image compression – A guide to the trade-off between image size and quality” blog.
How do I adjust the timeout?
If you’re running into timeout issues in the process of sending large images to be processed, you can use the “’UPDRAFT_TASKS_LOCK_TIMEOUT’” constant of WP-O Image Optimisation to adjust the timeout period for optimisation API requests.
define(‘UPDRAFT_TASKS_LOCK_TIMEOUT’, 60);
What if I have lots of images?
If you have hundreds or even thousands of existing images on your website, the Bulk Optimisation option lets you edit and compress as many images as you need together. You can also set-up Auto-Optimise, where the plugin will automatically compress your images as and when they are uploaded.
Will the quality of the image suffer?
There may be a slight loss of image quality, but in most cases the quality loss is so tiny, it can’t even be noticed. Once your images are converted to a smaller file size, you will of course lose some of the data from the original file and the more you compress it, the more degradation occurs. One of the biggest reasons why we use lossy compression is that it maintains better image quality compared to lossless compression, while still giving a significantly reduced file size.
What if I make a mistake?
We know how easy it is to make mistakes when editing your images, which is why Image Optimiser offers the ability to backup your original files so you can quickly restore them in case you need the original full quality image.
Why is my uploads folder so big after compressing?
The “backup original images” option preserves original (uncompressed) copies of your images with this setting enabled. This will nearly double the size of your uploads folder but provides a simple backup solution for your original media files. You can turn this off if you want to save space.
How do I use WP-Optimize image optimization?
For a detailed walk-through on how to use the WP-Optimize image optimization feature, we put together a video that takes you through all the necessary steps:
Full written instructions on how to best compress and optimize your images can also be found here.
How to configure automatic WebP conversion
WP-Optimize now offers automatic conversion of JPG and PNG images to the WebP format during image compression.
To configure automatic WebP conversion, navigate to WP Admin -> WP-Optimize -> Images. You’ll find the WebP option under the Image Compression tab.
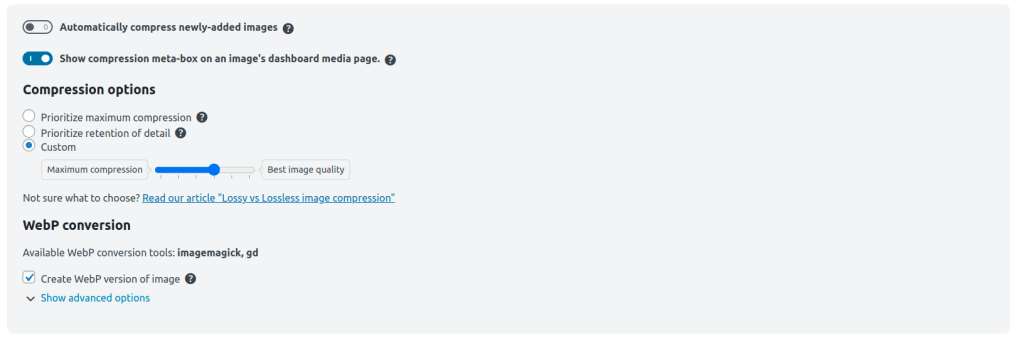
The WebP serving method (either htaccess redirection or AlterHTML) is auto-detected and applied by default. However, if you need to choose a specific method, you can enforce the use of the AlterHTML method by hooking into the wpo_force_webp_serve_using_altered_html filter. For example:
add_filter(‘wpo_force_webp_serve_using_altered_html’, ‘__return_true’);
FAQ for “No WebP conversion tools are available on your web server”, in case you get this error.
Cache (23)
How do I know my webpage is being cached (or why it isn’t)?
Make sure you are getting the page from the webserver (rather than from your browser cache) by emptying your browser cache and reloading the page. Do this whilst logged out (because the default setting is not to serve cached pages for logged-in users, since logged-in users usually want live content). Then, use the “View Source” function in your web browser to view the page source. Scroll down to the bottom, and you should see a line added by the cache:
![]()
However, note that if you are using a further service that minifies HTML (e.g. Cloudflare), then this line may have been removed. Another method is to inspect the contents of the directory wpo-cache inside your wp-content directory.
If your page is not being served from the cache, and you want to find out why not, then firstly – are you sure it is not being so served? As just mentioned, minification will remove HTML comments, like the line above. If you are sure, then you should edit your wp-config.php file, and change the WP_DEBUG setting to true, like so:
define('WP_DEBUG', true);
Then, reload the page, and view the HTML source. The reason will be given at the bottom – if it is not being removed by minification. If you need to first turn off minification, then do so.
![]()
Does the WP-Optimize page cache work with non-pretty (query parameter-based) permalinks?
No. It’s necessary to have pretty permalinks of the type http://xxxxx.com/my-post/ rather than http://xxxxx.com/?p=1234. Pretty permalinks are the WordPress default setting, and there is no good reason to turn them off, so you should not have a problem with this.
Note that permalinks including /index.php/ are cacheable. It is only those based upon query parameters (?…) that are not.
When does WP-Optimize clear the page cache?
Full cache purge:
- When changing/updating current themes and parent themes (of child themes)
- When changing/updating current plugins
- When turning off the cache feature in WP-Optimize
- When editing widgets
- When saving the customizer settings
- When updating a menu
- When Autoptimize purges its cache
- When updating permalink structure
- When changing cache settings
- When updating string translations in WPML plugin
- When updating the ‘posts_per_page’ option
- When purging Avada theme’s fusion caches
- When saving any of GetWooPlugins’ settings (Premium)
This can be changed by hooking into the filter wpo_purge_cache_hooks. E.g.
// Add a new action that will trigger a cache purge
add_filter( 'wpo_purge_cache_hooks', function( $actions ) {
    $actions[] = 'my_custom_action';
    return $actions;
} );
Partial cache purge:
- When you publish new content or update/edit existing content, the cache for that post/page will be cleared, as well as associated content (category archives, blog archives)
- When comments are approved, or their status changes
- When terms are created or updated
- When changing/updating stock quantity of WooCommerce product or product variation
- When updating the ‘page_on_front’ option
- When updating ‘page_for_posts’ option
- When updating the ‘URLs to exclude from caching’ WP-Optimize caching configuration
- When trashing a post
- When running importers
- When WooCommerce product is on sale (Premium)
Is the WP-Optimize page cache compatible with Gutenberg and WordPress 5.0+?
Yes, it is compatible with Gutenberg, the new content editor in WordPress 5.0+.
Which web servers is WP-Optimize compatible with?
WP-Optimize is compatible with all web servers, including:
- Apache
- NGINX
- Microsoft IIS
- Litespeed
- Lighttpd
However, only Apache makes it possible for a WordPress plugin to turn on Gzip compression and static caching headers; thus, on other webservers, WP-Optimize can only test and advise whether these beneficial features are active, but cannot itself turn them on.
How do I cache only the home page?
Add /.+ to the setting “URLs to exclude from cache” on the cache “Advanced settings” tab.
Will pages in the WP admin dashboard be cached?
No, WP dashboard pages are not cached. These usually contain unique content each time they are generated and it is not desirable to show dated content. You may however notice faster loads because the overall load on the site has reduced.
Why is the admin bar not displayed ?
If you cannot see the admin bar on the front-end after enabling cache, you should disable the “WP logged-in users cache” option.
Which WordPress and PHP versions are supported?
To use all features in the plugin, a minimum of version WordPress 4 with PHP 5.3 is required.
How do I enable/use page cache
Go to WP-Optimize -> Cache and enable caching
You’re good to go!
If you run an e-commerce, have a custom login page or any page that has dynamic content, you might want to exclude certain urls from the cache. See Excluding an url from the cache for more details.
Is WP-Optimize compatible with others cache plugins like WP Super Cache or W3 Total Cache?
Yes. You cannot use two page caches at the same time, and should not try. However, the WP-O page cache will only be switched on if you choose to turn it on; otherwise, it will have no effect on the site (either cacheing or performance). It is not turned on by default. Thus, WP-O can happily co-exist with other plugins.
(N.B. Also, because of how page cacheing works in WordPress, it is not possible to have more than one turned on at the same time; they might both think they’re turned on, but in effect, only the most recently turned-on will be doing anything).
A notification about file owner appears along with an FTP form, how can I resolve this?
The plugin uses PHP functionality to write to files, it cannot write or modify files it will give you a warning. Typically, you should tell your web host about the permission issue and they should be able to resolve it.
You can however try adding define(‘FS_METHOD’, ‘direct’); to wp-config.php to circumvent the file and folder checks. See this for more information of setting up file and folder permissions for WP
I see garbage characters instead of a normal web site, how do I fix this ?
- If a theme or its files use the call php_flush() or function flush() that will interfere with cache, making the plugin send cached files before essential operations have finished. The flush() call is no longer necessary and should be removed.
- Some hosting providers, such as GoDaddy or wordpress.com, provide their own caching solutions. This will often interfere with WP-Optimize’s cache, and could result in those garbage characters.
- Using other speed plugins that force GZIP output can result in this issue. One example is the GZIP compression feature in the plugin “Far Future Expiry Header”, or the setting “enable compression” in the plugin PageSpeed Ninja, which are not compatible with WP-Optimize.
To find out if this is the issue, you can search the code for ob_gzhandler or gzencode. If any of those two strings is found (outside of WP-Optimize), it could be the source of the issue.
What is Gzip compression?
When a user visits your website a call is made to your server to deliver the requested content. Gzip compresses your webpages and style sheets before sending them over to the browser. This drastically reduces transfer time since the files are much smaller.
Gzip compression is really effective because CSS files and HTML files use a lot of repeated text and have plenty of whitespace. Since Gzip compresses common strings, this can reduce the size of pages and style sheets by up to 90%.
How do I use WP-Optimize caching?
For a detailed walk-through on how to use the WP-Optimize caching feature, we put together a video that takes you through all the necessary steps:
What is cache lifespan?
WordPress uses nonces as security tokens which are printed in the source code of the page. These nonces cannot be reused and are valid for 12 hours by default, but developers can change that value. The nonce getting invalidated can affect all kinds of functionality on the site like form validation or the visual appearance of a page among others.
Setting a cache lifespan to under 10 hours ensures the cache is flushed automatically once the nonce expires. This way you can use WPO cache on sites which use nonces.
The cache lifespan option is set to 10 hours by default, but you may have go down to 8 or even less. A lower cache lifespan value will result in more frequent cache update activity on your server, and thus more preload processes, if activated. If you notice any issues due to high server load, set a higher interval for the preloader.
Is WP-Optimize compatible with Cloudflare
Yes! No special configuration is needed. Page cacheing on the WP site (that done by WP-Optimize) is independent of proxy cacheing (e.g. Cloudflare) – you can use both, or neither, and they will complement eachother and not interfere.
Just one thing to note – Cloudflare will strip out the special HTML comment at the bottom of the source of a page that is helpful to confirm that page cacheing is working, so, don’t be confused by that – it’s absence doesn’t indicate it’s not working.
User specific cache
User specific cache is specifically built for your membership site, or any type of site where pages contain user specific content.
Enabling “User specific cache” will create a cache version for each logged-in user, resulting in great performance for your website members.
Note that if you have many users, this could result in a large amount of files.
The website will also be cached for non logged-in users.
Note that the cache preloader will only preload the cache for non logged-in users.
NB: User specific cache is a premium feature
How do I generate separate cache files based on a cookie key?
You can use the `wpo_cache_cookies` filter to generate separate cache files. For example, you may want to generate separate cache files for different currencies. You can modify and use the following code snippet to do so:
<?php
add_filter('wpo_cache_cookies', 'myprefix_add_cache_cookies', 20, 2);

function myprefix_add_cache_cookies($cookies) {
if (// Check if some feature exists that needs separate cache) {
$cookie[] = 'cache_key_that_needs_separate_cache';
}
return $cookies;
}
How does static file cache work
Static content is any content that can be delivered to an end user without having to be generated, modified, or processed. The server delivers the same file to each user, making static content one of the simplest types to cache and transmit over the Internet.
You can tell the browser to reuse a locally cached copy of these static files instead of requesting them from your server each time the page loads. Also if the file changes however the modified time on it changes and the browser is forced to fetch a fresh copy. This will not only save valuable bandwidth but also ensure a faster load time your visitors.
You can set the time for which these files are valid using the static file cache option in WPO. It is set to 28 days by default. Do note that this will work only if the user has a copy of the static file stored in the browser from an earlier visit to your site.
How to resolve an error in advanced-cache.php
If you activate 2 caching plugins (or at least the functionality) at the same time, this might cause a fatal error and break your site.
Follow these instructions to recover your site:
- Connect to your server via FTP (or an other way if you prefer).
- Browse to the root of the WordPress installation, where you should have a file named
wp-config.php. - Download this file and open it in a text editor, such as notepad (Windows) or textedit (Mac).
- Locate the line
define('WP_CACHE', true);, delete it, save the file and upload it back via FTP. - Then still via FTP, enter the folder
wp-contentand delete the fileadvanced-cache.php - You should now be able to reconnect to your administration.
- Go to one or all of your caching plugins settings, and only keep 1 activated.
If the error comes back before you had a chance to do this:
- Try the first part again, and before going to the admin, do the following:
- Using FTP, browse to the folder
wp-content/plugins, and rename the folders of all caching plugins (for example by adding a-). - Then go to Plugins in your administration, and make sure the cache plugins are deactivated.
- Using FTP, browse to the folder
wp-content/plugins, and rename the folders of all caching plugins back to their original names. - You can now reactivate the caching plugin of your choice.
How do I know what cache file is being used for displaying a page?
If you want to check what cache file is being used for displaying a page, then you should edit your wp-config.php file, change the WP_DEBUG setting and the WPO_CACHE_FILENAME_DEBUG to true
define(‘WP_DEBUG’, true);
define(‘WPO_CACHE_FILENAME_DEBUG’, true);
Then, purge the cache, reload the page and view the HTML source. Scroll down to the bottom, and you should see a line added by the cache:
<!-- Cached by WP-Optimize (gzip) - https://getwpo.com - Last modified: Wed, 01 Dec 2021 10:47:38 GMT --><!-- WP Optimize page cache debug information -->
<!--
Extension: .html
Filename: index.html
--->
Why does WPO always serve same cached file, regardless of the user’s cookie consent state?
Users should use a cookie consent plugin which doesn’t generate different pages based on cookie consent. Regardless of the consent state, the generated page should be the same and the consent state should be managed by JavaScript.
One such plugin we can recommend that uses the above suggested method is the CookieYes plugin:
Minification (16)
Why minify my WordPress site?
WP-Optimize’s Minify feature is all about increasing the speed of your WordPress site for your users.
One way Minify does this is by reducing the size of your HTML, CSS and JavaScript files such as removing unnecessary spaces and lines from the files.
Another way is that your files are merged into as few files as possible. This reduces the amount of load on your web server and can be quicker to load fewer files.
You can also defer the loading of any CSS or JavaScript file. This means any large or extraneous CSS or JavaScript file can be loaded independently from the core of your WordPress site; giving your users quicker access to your site.
Preload critical assets
Preloading of critical assets is a premium feature of WP-Optimize.
Some assets which are considered critical might be loaded later because they are included via a script or from within a CSS file.
Typical examples include font files and background images. Loading these types of assets i.e. ones that users need for a page to function correctly, after non-critical assets doesn’t make sense. It negatively impacts page load times and user experience.
Preloading those assets however enables them to be loaded in priority order.
You can check Google’s articles here and here for more technical information.
Can WP-Optimize minify JavaScript?
Absolutely. When you enable WP-Optimize’s minify feature all your JavaScript files will be minified by default.
You can configure its settings by going to WP-Optimize > Minify > JavaScript
Can WP-Optimize minify CSS?
Absolutely. When you enable WP-Optimize’s minify feature all your CSS files will be minified by default.
You can configure its settings by going to WP-Optimize > Minify > CSS.
What does “Reset the minified files” actually do?
Pressing the “Reset the minified files” does:
- delete the temporary files used when generating the minified assets
- delete old minified files (more than 30 days old)
- adds a folder for the new minified files, which will be generated when visiting a page
The previously minified CSS files will remain on the server until they expire, or until they’re deleted using the button “Delete all the files generated by minify”.
How do I load JavaScript scripts asynchronously?
Loading JavaScript scripts asynchronously, also known as deferring your scripts, allows you to load your JavaScript scripts separately from the core files of your website.
Follow these steps to load your scripts asynchronously:
- Go to WP-Optimize > Minify > JavaScript
- Scroll down to the section labelled, “”Load JavaScript asynchronously”
- Type in the name of your scripts — one per line — that you wish to load asynchronously:

- Click ‘Save settings’
The scripts you entered will now be loaded asynchronously and will not affect your website’s initial page load speed.
How do I only merge or only minify my JavaScript scripts?
For various reasons such as debugging, or if your assets are already minified, you can choose merge your scripts without minifying them by doing the following, or vice-versa:
- Go to WP-Optimize > Minify > JavaScript
- Scroll to the “JavaScript options” section
- Uncheck the “Enable minification of JavaScript files” or “Enable merging of JavaScript files” checkbox:

- Press ‘Save settings’
You can disable both options if you wish to only use the “Load JavaScript asynchronously” option.
How do I exclude individual JavaScript scripts from being minified and merged?
You can remove any of your JavaScript scripts from being merged or minified by doing the following:
- Go to WP-Optimize > Minify > JavaScript
- Scroll to the “Exclude JavaScript from processing” section
- Type in the name of your scripts — one per line — that you wish to exclude:

- Click ‘Save settings’
The scripts you entered will now be removed from both the minification and merging process and will load as normal.
How do I exclude all JavaScript scripts from being minified and merged?
You can completely disable the merging and minification of all your JavaScript scripts by following these steps:
- Go to WP-Optimize > Minify
- Click ‘ Process JavaScript files’:
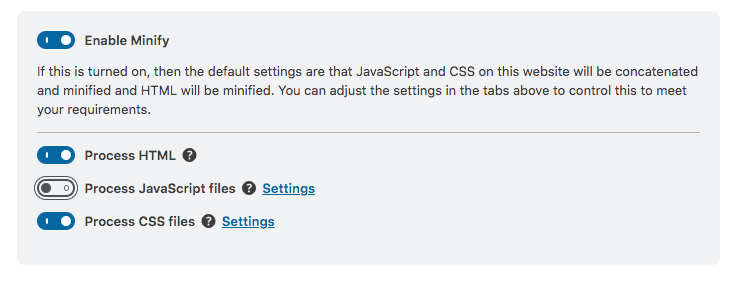
Your JavaScript scripts will neither be minified nor merged. You can enable the minification and merging of your JavaScript scripts simply by clicking it again.
Note: If you wish to still use the asynchronous loading of JavaScript, you may keep this setting on, and disable merging and minification settings in the JavaScript tab.
How do I load CSS files asynchronously?
Loading your CSS files asynchronously, also known as deferring your files, allows you to load your CSS files separately from the core files of your website.
Follow these steps to load your files asynchronously:
- Go to WP-Optimize > Minify > CSS
- Scroll down to the section labelled, “”Load the following CSS files asynchronously”
- Type in the name of your CSS file — one per line — that you wish to load asynchronously:

- Click ‘Save settings’
How do I exclude all CSS files from being minified and merged?
You can completely disable the merging and minification of all your CSS files by following these steps:
- Go to WP-Optimize > Minify > CSS
- Click ‘Process CSS files’:
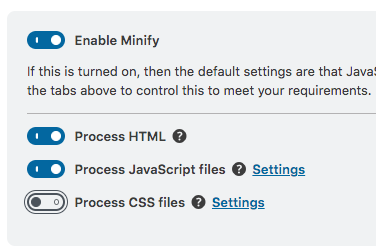
Your CSS files will neither be minified nor merged. You can enable the minification and merging of your CSS files simply by clicking it again.
Note: If you wish to load CSS files asynchronously, you should keep this setting enabled, and disable minification and merging in the CSS settings.
How do I exclude individual CSS files from being minified and merged?
You can remove any of your CSS files from being merged or minified by doing the following:
- Go to WP-Optimize > Minify > CSS
- Scroll to the “Exclude the following CSS files from processing” section
- Type in the name of your CSS files — one per line — that you wish to exclude:
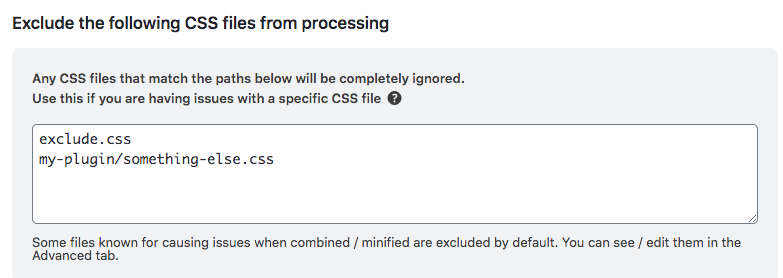
- Click ‘Save settings’The files you entered will now be removed from both the minification and merging process and will load as normal.
How do I merge but not minify my CSS files, or only minify and not merge my CSS files?
You can merge your CSS files without minifying them — or vice-versa — by doing the following:
- Go to WP-Optimize > Minify > CSS
- Scroll to the “CSS options” section
- Uncheck the “Enable minification of CSS files” or “Enable merging of CSS files” checkbox, depending on your needs:
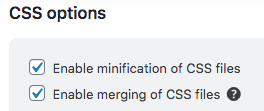
- Click ‘Save settings’
How can I eliminate render-blocking resources?
You can eliminate all render-blocking resources by deferring all non-critical JavaScript and CSS files.
You can defer your JavaScript files by going to WP-Optimize > Minify > JavaScript and going to the “Load JavaScript asynchronously” section.
For more precise steps on how to defer your JavaScript files go here.
You can defer your CSS files by going to WP-Optimize > Minify > CSS and going to the “Load the following CSS files asynchronously” section.
For more precise steps on how to defer your CSS files go here.
When enabling minify, my site’s layout is broken. How can I fix it?
This usually means one or more of your CSS files are incompatible with the minification or merging process. It can also be caused by errors in the CSS’s syntax.
You can check the CSS’s syntax by using an online CSS syntax checker such as csslint.net.
If your syntax is not causing the issue, or you cannot change the file with an issue, you can either
- exclude the problematic CSS files from the minification and merging process.
- or not merge the CSS.
To exclude individual CSS files from the minification and merging process, you can go to WP-Optimize > Minify > CSS and go to the “Exclude the following CSS files from processing” section (for more precise steps on how to exclude your CSS files go here).
To disable merging of CSS files, follow the instructions here.
When enabling minify, some functionality is broken. How can I fix it?
This usually means one or more of your JavaScript files are incompatible with the minification or merging process. It can also be caused by errors in the JavaScript’s syntax.
- The first thing to try is to enable the setting “Contain each included file in its own block” in the JavaScript options (WP-Optimize > Minify > Javascript > JavaScript options). This could “catch” an error, and prevent the rest of the code to be broken.
- If the first option didn’t work, try disabling merging of JavaScript files.

If none of the above works, disable processing of JavaScript files in the minify settings, and contact us on our free or premium support channels, we’ll do our best to help you troubleshoot the issue.
Power tweaks (2)
Speed up WooCommerce’s “Get total spent” query
This is one of two ‘Power Tweaks’ which are a feature of WP-Optimize Premium.
When a customer places their first order, WooCommerce calculates the total spent by running a very slow query. This power tweak replaces this slow query with two separate and much more efficient queries.
This will be especially effective on e-commerce websites containing large amounts of customers and orders.
It uses the filterwoocommerce_customer_get_total_spent to calculate the total spent when the user meta _money_spent is not set.
This issue has been reported to WooCommerce, but not addressed yet (See issue on Github).
Index the meta_key in the postmeta table
This is one of two ‘Power Tweaks’ which are a feature of WP-Optimize Premium. This power tweak works by ensuring the meta_key column in the WordPress postmeta table can be indexed.
While the meta_key column appears to be indexed by default, the use of utf8mb4 limits the indexing of columns to a maximum of 191 characters. The meta_key column is 256 characters long and so can not be indexed.
This power tweak changes the column size down to 191 characters where possible, allowing the column to be indexed which helps queries to run faster.
Google Analytics (1)
What is the Google Analytics WP-Optimize feature?
This feature lets you improve your website’s page speed by using either a local copy of Google Analytics or a lightweight alternative called Minimal Analytics.
Serving Google Analytics locally
You can add Google Analytics to your site through a plugin or by adding the tracking script directly to your theme’s header, footer, or functions.php file. However, using the external Google Analytics script has some downsides:
- External scripts, like Google Analytics, can get flagged by Google PageSpeed Insights for inefficient caching. External scripts also rely on the provider’s settings, which may not be ideal. This can hurt your PageSpeed score.
- Google PageSpeed recommends limiting third-party scripts since each adds an extra DNS lookup, which slows performance.
You can improve your site’s speed by storing and serving Google Analytics locally instead.
Minimal Analytics
Minimal Analytics is a slimmed-down version of Google Analytics, reducing the impact of third-party scripts. The regular Google Analytics script is 52 KB, while Minimal Analytics is only 3 KB when gzipped. The trade-off? It only provides basic stats compared to the full Google Analytics dashboard.
For more details, check out the official Minimal Analytics page.
Which one should I use: Google Analytics or Minimal Analytics?
It depends on what you need. If basic stats are enough, Minimal Analytics is a great option. If you’re unsure, try Minimal Analytics first. You can always switch back to the standard Google Analytics if needed.
How do I use the WP-Optimize Google Analytics feature?
If you are currently using Google Analytics on your site, remove the script from any previously edited files such as header.php, footer.php and functions.php. You may also need to remove the tracking ID from any other WordPress plugins you are using to prevent conflicts or inaccurate tracking.
1. Get your Tracking ID
You can find a detailed guide on obtaining your tracking ID directly from Google.
2. Enable Google Analytics
- Go to WP-Optimize >> Minify >> Analytics
- Click the Enable Google Analytics button
- Enter your Tracking ID
- Choose Google Analytics (Gtag.js) or Minimal Analytics
- Click Save settings