WP-Optimize to release new Minify feature

We are happy to share with you that WP-Optimize will soon be adding an all new feature to our popular WordPress optimization plugin. In an upcoming release, users will soon be able to use an all-new Minify feature that will help make their websites run even faster.

How does minification work?

The minify process works by removing all the unnecessary characters from a piece of code, such as line breaks, white spaces etc. The minified code still works exactly the same as it did before the minification process, but the files now take up less space due to the removal of unnecessary information. This process has proved to have been very popular when being used on scripts, stylesheets and and other components on your website which can benefit from faster loading times. The Minify feature will further reduce HTTP requests to help speed up your site. This works by merging CSS and Javascript files into a group of files and attempting to use as few of these files as possible.

Our new Minify feature will be simple to use and intuitive. Most users just need to set it to default settings and let it do it’s thing. This new feature will be launched soon, so be sure to keep an eye out for it in an upcoming release of WP-Optimize


The post WP-Optimize to release new Minify feature appeared first on UpdraftPlus. UpdraftPlus – Backup, restore and migration plugin for WordPress.

How to increase website speed with WP-Optimize plugin

Faster website speeds can play an important role in the success of your website. The faster your website’s speed, the higher it can rank in search engines; which can attract more visitors, reduce bounce rate and help increase visitor to customer conversions. As a website owner, the speed of your site should be right at the top of your priority list.

To increase website speed there are a few techniques you can apply, including image compression, caching and database optimization. There are no end of plugins available that can individually help compress your images, optimize the database and cache your site. In the past you would have needed to install a separate plugin for each of these tasks as there was no single plugin available that did all these jobs.

Thanks to WP-Optimize, this has now changed; You can now get all the above features in one handy plugin. No more headaches from using and maintaining several different plugins and hoping that they have no security problems. With WP-Optimize, you can just install a single, secure plugin on your website and increase your site’s speed dramatically.

Video tutorial: Increase WordPress site speed with WP-Optimize

Before using the WP-Optimize plugin

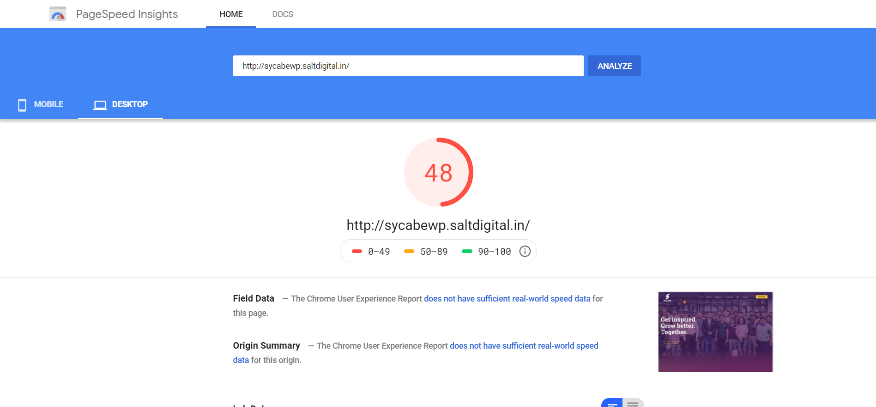
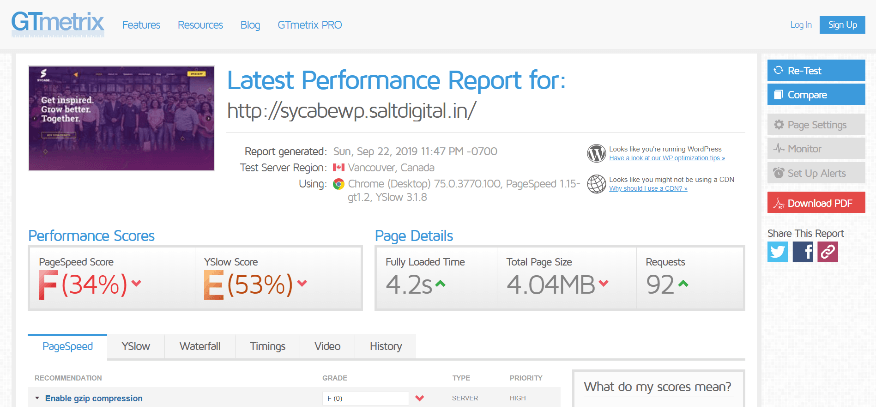
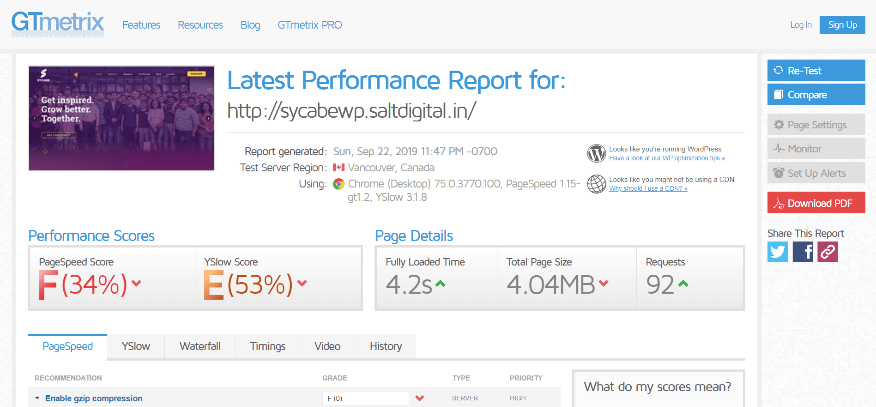
To measure the site’s speed before and after optimization on our test website, we will use the Google Pagespeed Insights and GTMetrix speed measuring websites. When our test website is run on these services before using the WP-Optimize plugin, we get the following scores.

Using the WP-Optimize plugin

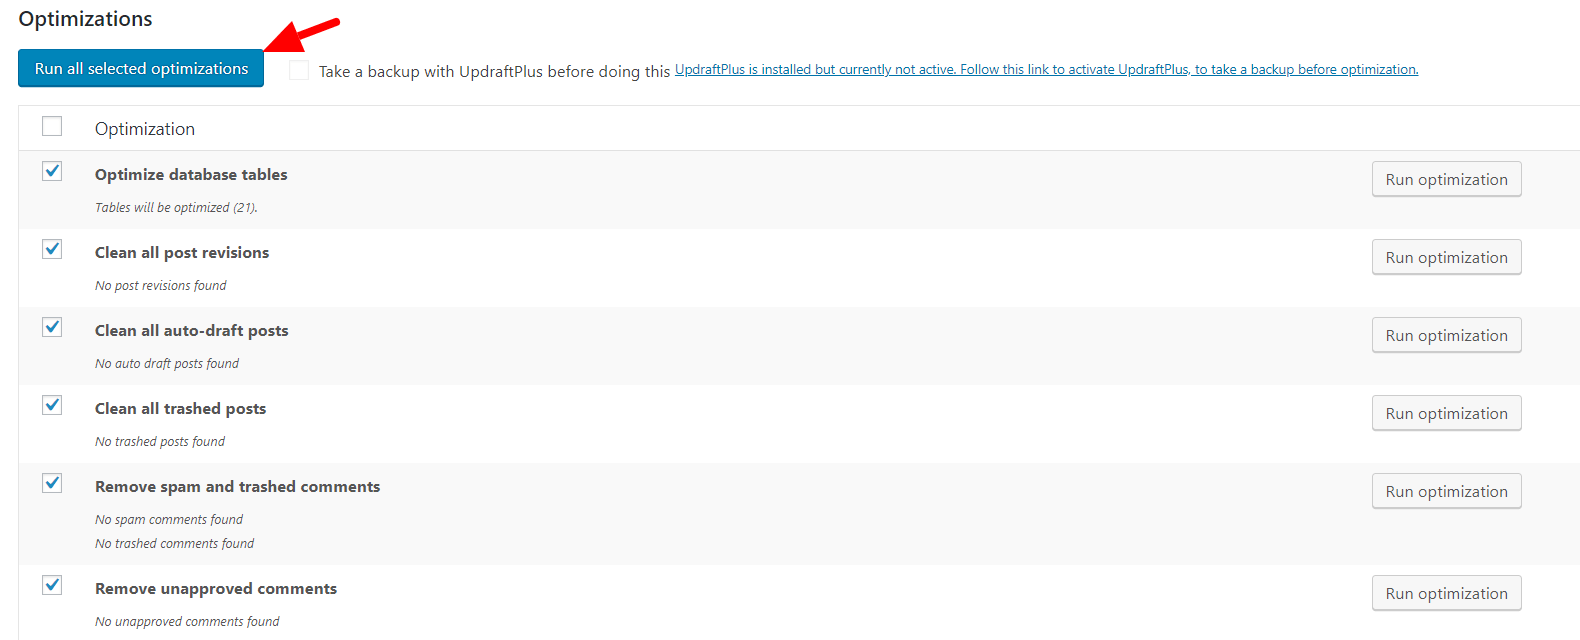
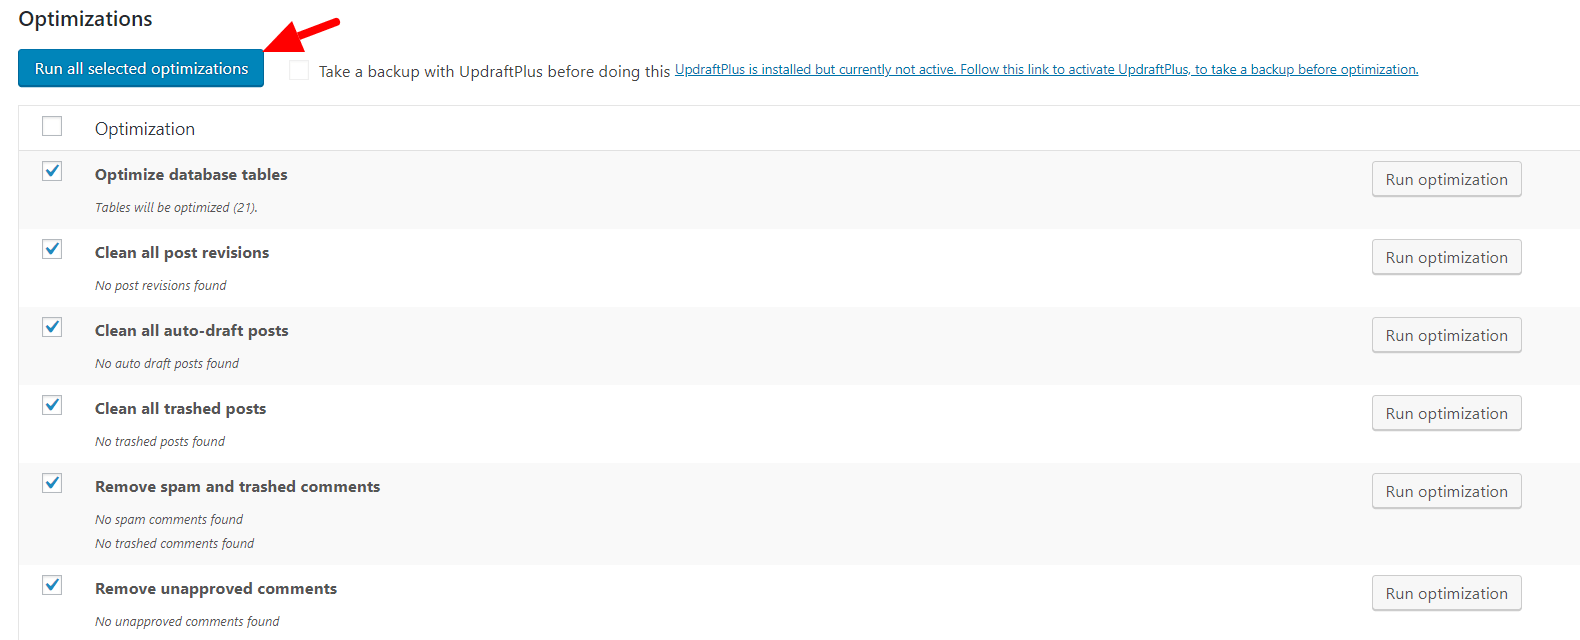
To start the optimization process, first install and activate the WP-Optimize plugin on your website. After activating the plugin, go to WP-Optimize->Database. You will find several default options selected by the plugin that should be optimized. 

As with all optimization procedures, it is always recommended to first take a backup of the database backup before running the database optimization option. Once the backup is complete, press the ‘Run all selected optimizations’ button. The plugin will now start removing orphan records from your database, resulting in reduced database size and better server response time.

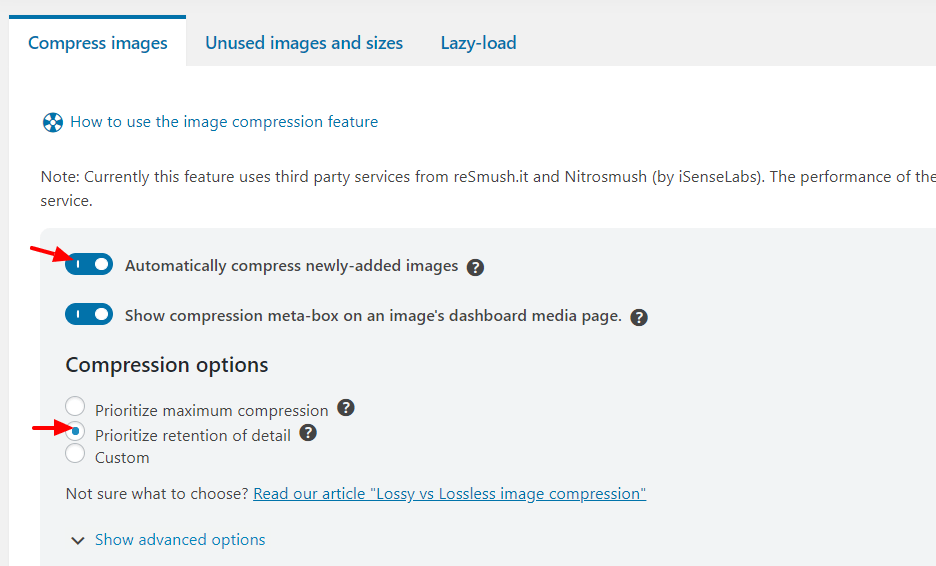
Next, head over to WP-Optimize->Images. Turn on ‘Automatically compress newly-added images’, to make sure any image you add later will be compressed. Under the compression options, you will find 3 choices where you can select your preferred compression choice. For the purposes of this test, we will choose the most popular option – ‘Prioritize retention of detail’, which saves space, but maintains higher image quality.

If you scroll down the page, you will find a list of your uncompressed website images. Image compression will reduce the size of the images, resulting in a smaller page size and thus a higher page speed score. 

Click ‘Select all’ and then press the ‘Compress the selected images’ button.


The WP-Optimize plugin will start optimizing your images using the external service reSmush.it or Nitrosmush. You can choose either service from the ‘Show advanced options’ drop-down. By default, reSmush.it will be the service selected.

When you check the site score on Pagespeed Insights, you will notice the recommendation for ‘Defer offscreen images’ – the recommended lazy-load technique. 

Lazy-load is a technique that defers the loading of non-critical resources (images, video) during page loading. These non-critical resources are instead loaded at the point when they are needed (e.g. when the user scrolls down the page). If possible, this technique should be employed as it will definitely speed up your website.

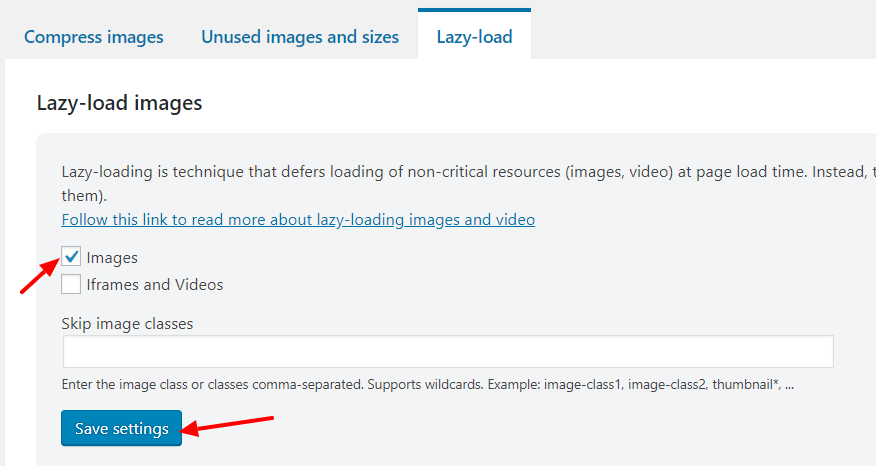
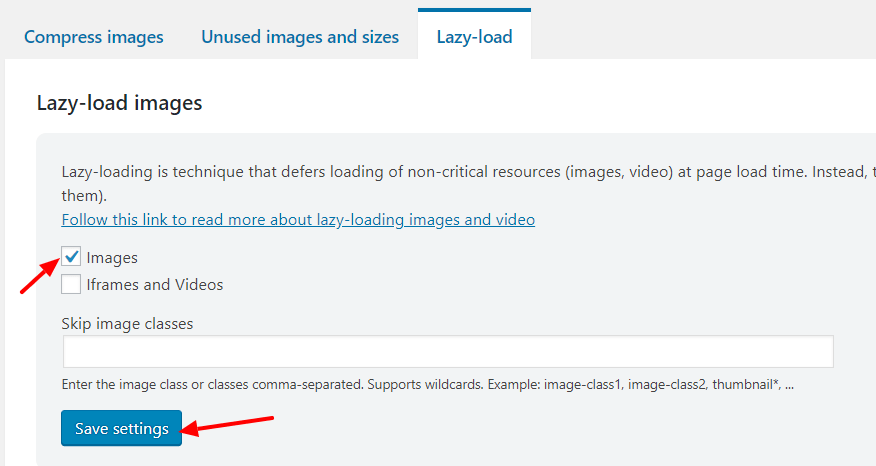
To enable this feature in WP-Optimize, go to the ‘Lazy-load’ tab and select the checkbox for ‘Images’ and ‘iframes and Videos’ (should you have any on your site) and press ‘Save settings’.

Next, set up the cache feature within WP-Optimize. To start, go to WP-Optimize>Cache. Within the ‘Page cache’ tab, turn on ‘Enable page caching’ and select the option for ‘Generate separate files for mobile devices’, if your website has a mobile specific theme. 

Don’t forget to save the changes

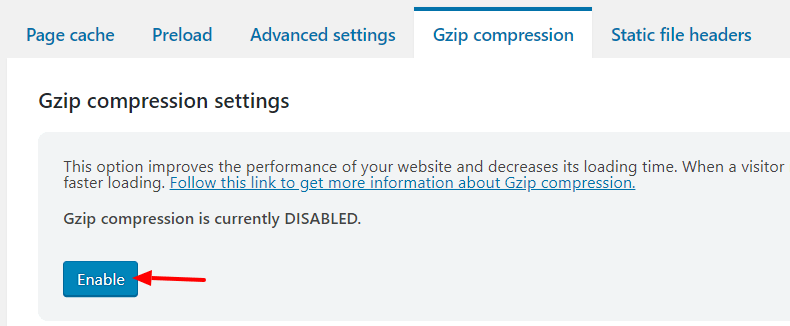
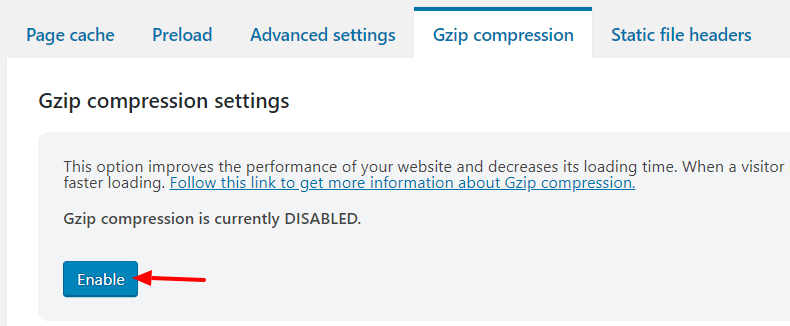
The following Gzip compression and static file caching should be done before enabling cache. Gzip compresses the requested resource before sending it, resulting in smaller file sizes and faster loading. Enable this option in the ‘Gzip compression’ tab.

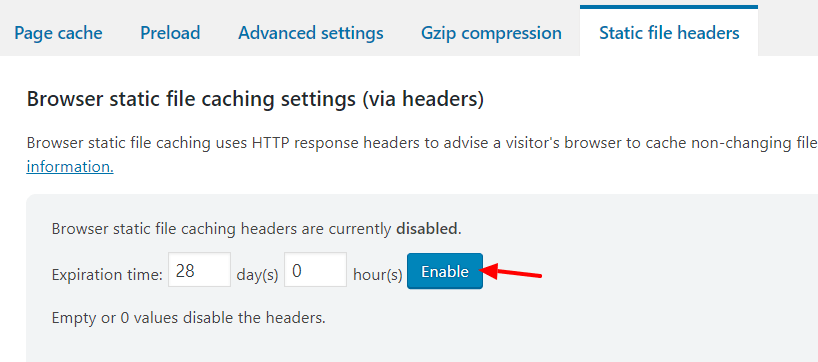
Finally, enable the browser static file caching settings in the ‘Static file headers’ tab. By doing this, it advises a visitor’s browser to cache non-changing files for a period of time so that it doesn’t attempt to retrieve them upon every visit.

After using the WP-Optimize plugin

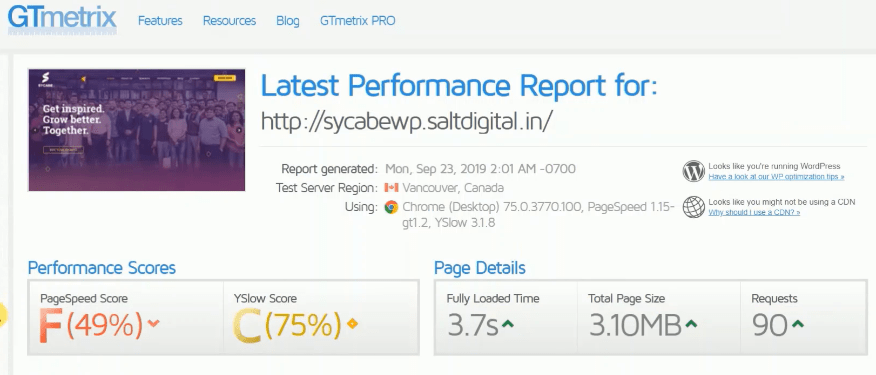
Now we are done setting up all the WP-Optimize settings, let’s check our test site’s speed score on Google Pagespeed Insights and GTmetrix again. This will evaluate your site’s performance and should give a better score compared to pre-optimization results.

Conclusion

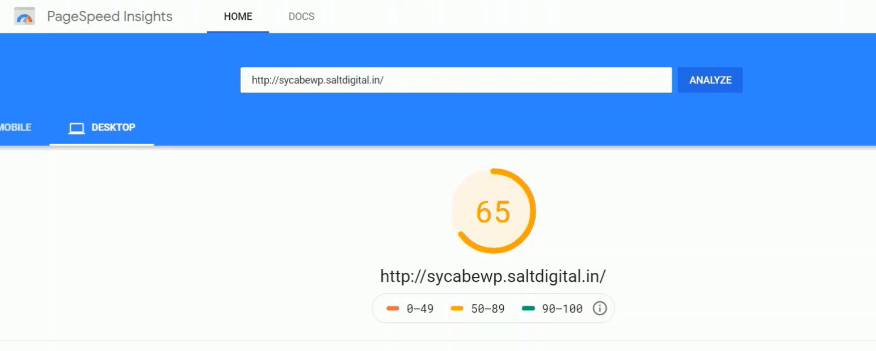
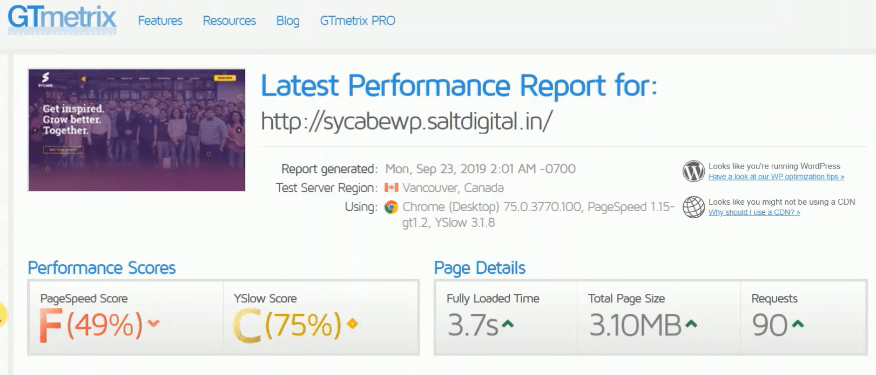
With just these few optimization techniques, the test site’s Google page speed has improved from 48 to 65, while the GTmetrix score has improved the PageSpeed score from 34% to 49%, YSlow score from 53% to 75%, fully loaded time from 4.2s to 3.7s and total page size from 4.04MB to 3.10MB.

When it comes to WordPress, site optimization is a hugely important step to perform before your launch your site. A properly optimized site will not only give your visitors a better user experience, but also help you succeed online. 

By using the WP-Optimize all-in-one plugin, you can get all the essential features needed for optimizing your WordPress website. Get a copy of WP-Optimize today and increase your website speed and let us know your feedback in the comment section below.

Discover the most effective ways to boost your WordPress site performance

Discover the most effective ways to boost your WordPress site performance

You’ve created a wonderfully designed WordPress page. But as good as it may look and feel, if it’s sluggish and takes too long to load, you can kiss your conversions goodbye and say hello to higher bounce rates.

In a world where the average consumer is busier, savvier, more demanding and less patient than ever, site performance really matters – a lot. According to Google research, more than half of all mobile site visits are abandoned if a page takes more than just three seconds to load:

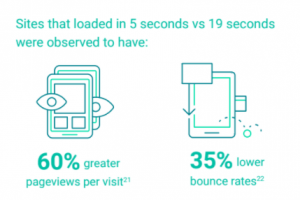
Faster pages, on the other hand, see better conversion rates, longer engagement and generate more revenue for their owners:

Every element of your website takes up space and memory, all of which increase your upload time and decrease your page speed. The more memory you use, the more sluggish your website is likely to be.

For WordPress site owners in particular, this represents a real challenge.  WordPress sites are built on a basic shell, which is modified by choosing a theme, layout template and then adding in various plugins. Each extra element means extra database queries and additional HTTP requests, every one of which slows down your page speed and diminishes a website’s performance.

Most of us might not even notice these tiny, incremental decreases in speed when we view our own websites, but even fractions of a second can add up, especially for mobile viewers. And considering that just one second can make the difference between an engagement or a bounce, improving the page speed is critical.

Fortunately, there are some easy steps you can take to reduce database space and speed up the loading time of your WordPress site, none of which require technical knowledge or coding skills.

We’ve come up with the following ways to improve your WordPress sites speed and optimize its performance without compromising on design:

Remove Unnecessary Assets

When building a WordPress site, you’ll invariably end up with things you thought you might use, but later discover that you don’t really need; like that picture you had to add three times to get the sizing right, or that extra theme you installed but then changed your mind about. All of these extras can add up, so it’s important to do a bit of cleaning up:

1. Start by going through your media library with a fine-tooth comb, removing any image files, videos, audio clips or other media files that you no longer need. If you have a huge library to go through, consider using a media cleaner plugin to make the job quick and easy.

2. Remove any unused plugins. This is one of the fastest and easiest ways to reduce the size of your database and speed up your site performance. Rather than just deactivating them (which basically turns them off but leaves them in the database), it is worth going through and deleting them properly:

3. Next, remove any unused themes. If, like most people, you built your own WordPress site, you probably tried a few (or many) different themes before settling on your final design. And all of those themes remain in your site’s database, hogging space and slowing things down. Get rid of them by clicking on Appearance > Themes then click on Theme Details for the theme(s) you want to remove. Then click on Delete in the bottom right corner.

One word of warning though – be careful not to delete the default WordPress theme, Twenty Fourteen:

“The reason is,” explains Rich Plakas from Connected Systems, “if one of the other 3rd party themes gets corrupted, either from a bad update or from you modifying theme files, you will experience the ‘WordPress White Screen of Death.’ Leaving the default theme gives you an easy way to get the site running again.”

4. Finally, delete all unnecessary HTML and extra code. If you have a pretty good understanding of how site coding works, there are a number of plugins you can use to clean up your code. But only those who know what they’re doing with HTML should use these plugins. Otherwise you may permanently change things you didn’t want to change.

Keep your WordPress site Updated and Secure

Updating may seem like a small thing, but it’s one of the most overlooked elements of site performance on any WordPress site. Like a smartphone, it requires these regular updates to ensure its operating system and applications stay up-to-speed and offer the latest features.

WordPress automatically pushes out updates on a regular basis. Each update provides new features and mends underlying security issues and bugs. Your WordPress theme and plugins may have regular updates, too; check in on your Dashboard frequently, and be sure to update whenever prompted. Failure to do so may make your website slow, unreliable and vulnerable to security breaches.

To  keep track of your WordPress updates and do it all from one convenient dashboard, we recommend using UpdraftCentral. UpdraftCentral is a highly efficient way to manage, update and backup multiple websites from one place for sites on which UpdraftPlus is installed. 

To help optimize your site, WP-Optimize can automate the otherwise technical and time-consuming task of cleaning up your WordPress database by removing old revisions, spam and trash. WP-Optimize also comes with a cache feature that loads your WordPress posts and pages as static files, thus reducing the processing load on the web server. With minimal configuration, it can help to improve your website’s speed and performance. Further optimize your site by compressing large images using WP-Optimize’s cutting-edge lossy/lossless compression techniques, allowing large images to be uploaded in an instant.

Relying on the WordPress updates alone is not really enough to keep your site protected in the event of a crash, hack or other system melt-down as WordPress is notoriously vulnerable to security problems.

To give you an idea of how big a problem this really is, check out WPScan’s vulnerability database, which lists real-time reports of current vulnerabilities in the WordPress core code, plugins and themes. As you can see from the nearly 15,000 vulnerabilities in the screenshot below, an unprotected site is at constant risk:

With that kind of risk exposure, many experts recommend using UpdraftPlus – the top rated and most popular WordPress backup plugin that can protect you from hackers, server crashes, bad plugins, and even user errors. If anything goes wrong, you’ll be able to easily restore WordPress from a backup and get your site to full working order.

Adopt a CDN

When optimizing for speed, it’s important to consider the distance your potential viewers are from your server. If you have a global audience with visitors coming from anywhere in the world, you’ll probably want to install a Content Delivery Network (CDN).

CDN is basically when you have a lot of highly optimized servers that span the planet, that allow you to hit the server that is closest to your location.

CDNs are used to prevent the issue of latency, which is an irritating delay that happens from the point when you request to load a web page to the point where the content appears onscreen. Latency, as you may have guessed, slows site loading speed down and has an adverse impact on site performance.

Installing a CDN on your WordPress site will help to ensure that it continues to perform well and load quickly, keeping visitors happy and reducing bounce rate, wherever they happen to be. You can find CDN plugins on WordPress.org; or, check with your hosting provider. Many of them provide CDNs at no or minimal costs.

Good site performance begins with cleaning out your assets, keeping your software updated, and using a good CDN for fast delivery. Once you get these basics down, you will be on your way to maintaining a high quality user experience and building a long-lasting relationship with your audience.

Dvora Goldstein – professional blogger and content marketer

The post Discover the most effective ways to boost your WordPress site performance appeared first on UpdraftPlus. UpdraftPlus – Backup, restore and migration plugin for WordPress.
How to increase and check website speed with the WP-Optimize plugin

How to increase and check website speed with the WP-Optimize plugin

Faster website speeds can play an important role in the success of your website. The faster your website’s speed, the higher it can rank in search engines; which can attract more visitors, reduce bounce rate and help increase visitor to customer conversions. As a website owner, the speed of your site should be right at the top of your priority list.

To increase website speed there are a few techniques you can apply, including image compression, caching and database optimization. There are no end of plugins available that can individually help compress your images, optimize the database and cache your site. In the past you would have needed to install a separate plugin for each of these tasks as there was no single plugin available that did all these jobs.

Thanks to WP-Optimize, this has now changed; You can now get all the above features in one handy plugin. No more headaches from using and maintaining several different plugins and hoping that they have no security problems. With WP-Optimize, you can just install a single, secure plugin on your website and increase your site’s speed dramatically.

Before using the WP-Optimize plugin

To measure the site’s speed before and after optimization on our test website, we will use the Google Pagespeed Insights and GTMetrix speed measuring websites. When our test website is run on these services before using the WP-Optimize plugin, we get the following scores.


Using the WP-Optimize plugin

To start the optimization process, first install and activate the WP-Optimize plugin on your website. After activating the plugin, go to WP-Optimize->Database. You will find several default options selected by the plugin that should be optimized. 

As with all optimization procedures, it is always recommended to first take a backup of the database backup before running the database optimization option. Once the backup is complete, press the ‘Run all selected optimizations’ button. The plugin will now start removing orphan records from your database, resulting in reduced database size and better server response time.

Next, head over to WP-Optimize->Images. Turn on ‘Automatically compress newly-added images’, to make sure any image you add later will be compressed. Under the compression options, you will find 3 choices where you can select your preferred compression choice. For the purposes of this test, we will choose the most popular option – ‘Prioritize retention of detail’, which saves space, but maintains higher image quality.

If you scroll down the page, you will find a list of your uncompressed website images. Image compression will reduce the size of the images, resulting in a smaller page size and thus a higher page speed score. 

Click ‘Select all’ and then press the ‘Compress the selected images’ button.

The WP-Optimize plugin will start optimizing your images using the external service reSmush.it or Nitrosmush. You can choose either service from the ‘Show advanced options’ drop-down. By default, reSmush.it will be the service selected.

When you check the site score on Pagespeed Insights, you will notice the recommendation for ‘Defer offscreen images’ – the recommended lazy-load technique. 

Lazy-load is a technique that defers the loading of non-critical resources (images, video) during page loading. These non-critical resources are instead loaded at the point when they are needed (e.g. when the user scrolls down the page). If possible, this technique should be employed as it will definitely speed up your website.

To enable this feature in WP-Optimize, go to the ‘Lazy-load’ tab and select the checkbox for ‘Images’ and ‘iframes and Videos’ (should you have any on your site) and press ‘Save settings’.

Next, set up the cache feature within WP-Optimize. To start, go to WP-Optimize>Cache. Within the ‘Page cache’ tab, turn on ‘Enable page caching’ and select the option for ‘Generate separate files for mobile devices’, if your website has a mobile specific theme. 

Don’t forget to save the changes.

The following Gzip compression and static file caching should be done before enabling cache. Gzip compresses the requested resource before sending it, resulting in smaller file sizes and faster loading. Enable this option in the ‘Gzip compression’ tab.

Finally, enable the browser static file caching settings in the ‘Static file headers’ tab. By doing this, it advises a visitor’s browser to cache non-changing files for a period of time so that it doesn’t attempt to retrieve them upon every visit.

After using the WP-Optimize plugin

Now we are done setting up all the WP-Optimize settings, let’s check our test site’s speed score on Google Pagespeed Insights and GTmetrix again. This will evaluate your site’s performance and should give a better score compared to pre-optimization results.

Conclusion

With just these few optimization techniques, the test site’s Google page speed has improved from 48 to 65, while the GTmetrix score has improved the PageSpeed score from 34% to 49%, YSlow score from 53% to 75%, fully loaded time from 4.2s to 3.7s and total page size from 4.04MB to 3.10MB.

When it comes to WordPress, site optimization is a hugely important step to perform before your launch your site. A properly optimized site will not only give your visitors a better user experience, but also help you succeed online. 

By using the WP-Optimize all-in-one plugin, you can get all the essential features needed for optimizing your WordPress website. Get a copy of WP-Optimize today and increase your website speed and let us know your feedback in the comment section below.

Sajid Sayyad

The post How to increase and check website speed with the WP-Optimize plugin appeared first on UpdraftPlus. UpdraftPlus – Backup, restore and migration plugin for WordPress.
WP-Optimize release new updated: Increase control over your site with a wide range of new tweaks

The latest update of WP-Optimize has been developed to give the user more control of their website’s optimization. The first of these updates is the ability to purge a single page or post from cache. Up until now if you wanted to purge a page’s cache, you had to purge the whole site. Users now have the option to purge a single post or page from the editing screen.

We’ve also added Lazy Load support for WooCommerce, making your web shop load faster. 

For our premium users, we’ve improved the unused image detection feature, which we’ll continue improving in the following releases. 

Users of the image compression feature can now also delete all backup images after a specified delay. 

The changelog for WP-O 3.0.12 (free + paid) is as follows. We recommend the update for all users.

  • TWEAK: Cache – Purge cache files when updating menu, saving the customizer and editing widgets
  • TWEAK: Cache – Do not show the reason for not caching when the request is DOING_CRON
  • TWEAK: Premium – Unused images feature – Improved detection on sites with many posts/images
  • TWEAK: Automatically delete smush image backups option
  • TWEAK: Premium – Unused images feature – Better detection of featured images
  • TWEAK: Cache – Ability to purge single page or post from cache
  • TWEAK: Cache – Display the content of advanced-cache.php to the user if it was not writable when enabling cache
  • TWEAK: Image compression – Automatically delete image backups option
  • TWEAK: Image compression – metabox now inherits the settings from the main screen
  • TWEAK: Image compression – Added feature to mark images as already compressed by another tool
  • TWEAK: Image compression – Added detailed log information when image compression fails.
  • TWEAK: Premium – Unused images feature – Improved detection on sites with many posts/images
  • TWEAK: Premium – Unused images feature – Better detection of featured images
  • TWEAK: Premium – Lazy load – Added WooCommerce support
  • TWEAK: Premium – Increased warning level and visibility when deleting unused database tables and unused images
  • TWEAK: Prevent a couple of unwanted PHP notices being logged when running cron via the command-line
  • TWEAK: Tweaked update notice wording

The post WP-Optimize release new updated: Increase control over your site with a wide range of new tweaks appeared first on UpdraftPlus. UpdraftPlus – Backup, restore and migration plugin for WordPress.

WP-Optimize expands to a market leading 3-in-1 optimization plugin with new caching feature

WP-Optimize expands to a market leading 3-in-1 optimization plugin with new caching feature

After a lot of development and hard work that has included our recent image optimization feature, we are excited to share with WP-Optimize users the latest breaking news; The all new caching feature has now been released! This new development makes WP-Optimize a market leading 3-in-1 plugin that now combines caching, database cleaning and image optimization that now all work together to help make your site run faster. WP-Optimize caching has been a highly requested feature that we have now available to both our free and premium users.. 

How does caching work?

Caching makes the most of your WordPress posts and pages by loading them as static files. When these static files are viewed by users, it reduces the amount of processing load on the web server and overload if PHP and MySQL are used. This can help improve the performance of the site and is a sure-fire way to ensure that web pages load at lightning-fast speeds.

How to use the WP-Optimize caching feature

Video walk-thru: While written instructions on how caching work can be helpful, for many users a simple walk-thru video can be a lot easier and quicker to process and understand. So be sure to check out the following video we made that takes you through the process of how to use cache. 


Setting up caching:

With WP-Optimize caching, we have specially designed the feature to give a wide range of options to the user. However, if you are the kind of person just wants to turn something on and let it run, just toggle the “enable page caching” button and we will automatically optimize all the different caching tasks for you. This feature enables users with all levels of knowledge to access the full advantages of caching.

How the caching settings appear in the plugin

If you prefer to do things yourself and dig into the finer details, you can manually setup your sites caching options yourself.

Mobile and logged in users cache

If you prefer to setup the cache yourself, there are options within the plugin that will let you manually set “mobile” and “logged in users” cache. Mobile cache enables users who access your site via a mobile or tablet to get a device specific cached version, while “logged in users cache” enables secured cached content for all of your logged in users. If you want to enable this option, just toggle the buttons to the on position. The options are just the first in an amazing long list of features that will make your site faster.   

Enable Mobile and logged in users cache

Preload options

You can further optimize your caching with scheduled preloader options. This features works by allowing the user to preload the pages of the site, further improving its performance. When combined with the other caching features within WP-Optimize, the preloader is a powerful tool that can help speed up loading times.   

Advanced settings

In the “Advanced settings” tab, you can add any URLs, cookies and user agent strings you would like excluded from the cache. These options can be a great tool and very useful as they allow you to exclude sensitive site pages from the caching engine, such as login URLs.

G-Zip compression

This option can give a huge percentage boost as part of your total savings and is a simple and effective way to save bandwidth and further speed up your site. G-Zip compression reduces the size of files sent from your server to increase the speed to which they are transferred to the users browser. Just click “enable” to activate this option.  

Static file caching

Finally, “Static file caching” lets you use HTTP response headers. Once enabled, a visitor’s browser will know if it should cache non-changing files, so it does not need to retrieve them upon every visit, further improving the loading speed of your site. Just set your expiration time and press “enable” to activate.

WP-Optimize in summary

The caching feature is the latest in a series of site optimization options that aim to make WP-Optimize your one stop shop for improving your sites speed and performance. Along with image optimization and database cleaning, the addition of caching aims to make WP-Optimize the only WordPress optimization tool you need. 

To find out how to use all the WP-Optimize features, please follow the links for further information on Database Cleaning and Image Optimization

To find out more about WP-Optimize, visit the website today.

The post WP-Optimize expands to a market leading 3-in-1 optimization plugin with new caching feature appeared first on UpdraftPlus. UpdraftPlus – Backup, restore and migration plugin for WordPress.