In this release we’ve added loads of new features and tweaks.
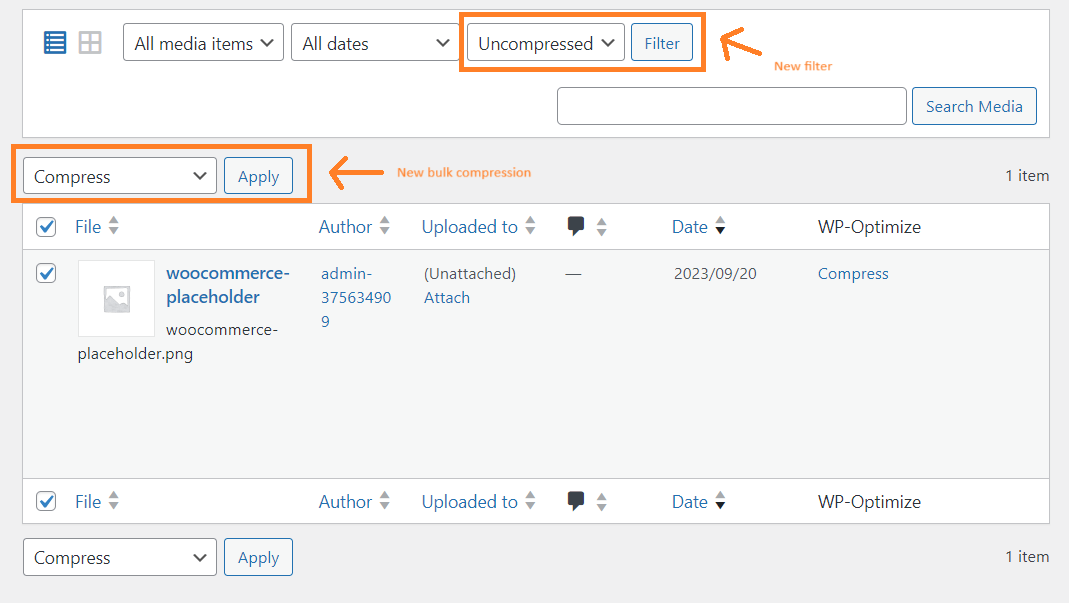
We’ve made some major improvements to image optimization. Premium users now have the ability to perform bulk image compression and restoration directly from the WordPress media library. In the past, this was only possible in the images tab. With this update, you can selectively restore multiple images or compress them in bulk, making it easier to manage your media files. We’ve also added a new filter in the media library that allows you to filter images by their compression status.
Free and premium users can also automatically delete old images when new scaled versions are created. WP-Optimize will use the scaled images instead of the original ones, saving disk space.
And you can now control how WebP images are served. Previously, the plugin automatically chose between .htaccess redirects and HTML alteration methods for WebP files based on your server type. With the new ‘wpo_force_webp_serve_using_altered_html’ filter hook, users can force WP-Optimize to use the HTML alteration method. This can help you avoid compatibility issues on certain hosting environments.
We’ve also made some general tweaks and updates. We will no longer minify CSS/JS files that are already minified by WordPress core or other plugins/themes to save on processing time. We also made sure that WP-Optimize is compatible with WordPress’s new script loading strategies.
Additionally, we updated the old codebase to use HeartBeat API instead of Ajax calls. HeartBeat API is built into WordPress and provides a more standard way for communication between the WordPress server and the browser. This change will help to reduce your server load and speed up your site. For sites that don’t use HeartBeat, we’ve included backups to keep things running smoothly.
Next-day interim update: Now that our main developer with responsibility for this area of the code has been able to get out of bed (he is in a different time-zone) and conducted an initial analysis, things look quite different. The controversy is entirely mistaken, and would not have existed if we had been consulted in any of our available support channels (e.g. the open-to-everyone forum on wordpress.org) and allowed sufficient time to investigate before publication (we first became aware at the end of a Monday that was a UK public holiday). In fact, on the analysis that we have now had time to perform, the controversy originated with a direct competitor who, after misconfiguring the plugin (what he configured is not a default option, and could only be achieved by either overlooking or misunderstanding the described use-cases and entering contrary details into the settings field), subsequently used the resulting Twitter storm to promote his own competing products. Fuller details will be forthcoming once our investigations are complete.
* * *
In the last hour I have been made aware of some code in WP-Optimize’s “minify” module whose actual purpose (whether legitimate, or whether just to “cheat” page-speed-measurement tools) is questionable. We are investigating this, and a statement has been posted here whilst we carry that investigation out: https://wordpress.org/support/topic/code-under-investigate-in-wp-optimize/.
For clarity, we:
definitely do not approve of such “cheats”
will remove the code immediately after our investigation if it is found to be such
and as explained at that link, inherited that particular section of code from another open-source minification project under an open-source licence, and did not at the time notice its suspect characteristics which we have now become aware of.
As stated at the above link, there is no question of the code being dangerous, vulnerable or useful for hackers – the question is whether it does anything useful to optimise your website for real-world visitors, or is just there to get better scores on speed measurement tools. Our products’ integrity and customers’ trust is essential for us, and we will take appropriate action as soon as our investigation is completed.
David Anderson (on behalf of WP-Optimize / Team Updraft)
With all the different image formats available for your WordPress site, it can be a little confusing when deciding which one is the right option. While most users have stuck to the tried and tested PNG or JPEG formats, a revolutionary new image format called WebP is now available.
WebP provides superior lossless and lossy compression for any images you add to your WordPress site. By using WebP, WordPress users can create image files that are not just smaller, but also allow your site to run and load faster.
When comparing WebP to other popular image upload format options, we can see how much of an improvement can be achieved by switching to this new format:
If you upload an image using WebP, its lossy compression algorithm uses predictive coding when encoding the image. In using this predictive coding, it uses the values of the block of pixels next to each other to predict the value of the block and encode only the difference. For more detail of the compression technique, please check out this link.
WebP in WP-Optimize
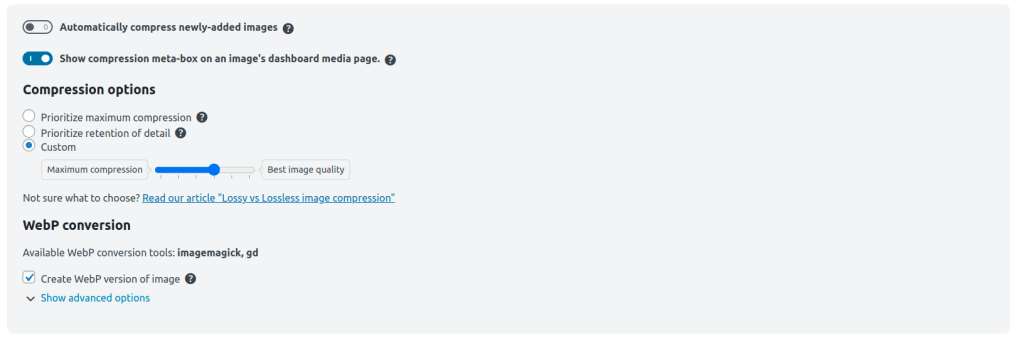
While there may be existing plugins already on the WordPress market that enable you to upload in the WebP format, WP-Optimize uses a different process that is not only much quicker, but also much easier to carry out. With other plugins, you have to go through the complicated process of having to select the converter (to convert from JPEG/PNG to WebP) and the method to serve the WebP files. With the WP-Optimize WebP upload method, we offer a simple one click solution. So when users select the WebP format for their images, conversion can be done there and then automatically when uploading or compressing images.
Conclusion
Given how important the loading speed of your site is for your SEO score, WordPress users cannot afford to miss out on the big savings that can be made by using the WebP format with WP-Optimize. Download and install WP-Optimize today to start using this feature and improving your WordPress site.
The latest update for WP-Optimize 3.2.1 has now been released. As you can see from the list below we have been hard at work making changes, and as such – this latest update comes with a huge number of tweaks and fixes. As part of the new update, we have made changes so that WP-Optimize helps improve the performance and user experience in some very important areas of your WordPress site, including caching, image compression and minifying.
Try out he new and updated version of WP-Optimize today and see the difference.
FIX: Apply different image compression levels
FIX: Cache – Purge WooCommerce product page after stock update
FIX: Database errors after adding a new site
FIX: Flatsome theme compatibility with google fonts
FIX: Image compression advanced settings, display default backup days instead of empty value.
FIX: Image compression was not working when the image extension used capital letters
FIX: Premium – resolve potential admin-area PHP error if the deprecated mailchimp sync plugin and MC4WP plugin are both active (and potentially other situations where a plugin deactivates another)
FIX: Premium – Unused images – compatibility with PHP 8
FIX: Premium – Unused images – issue with parenthesis in name
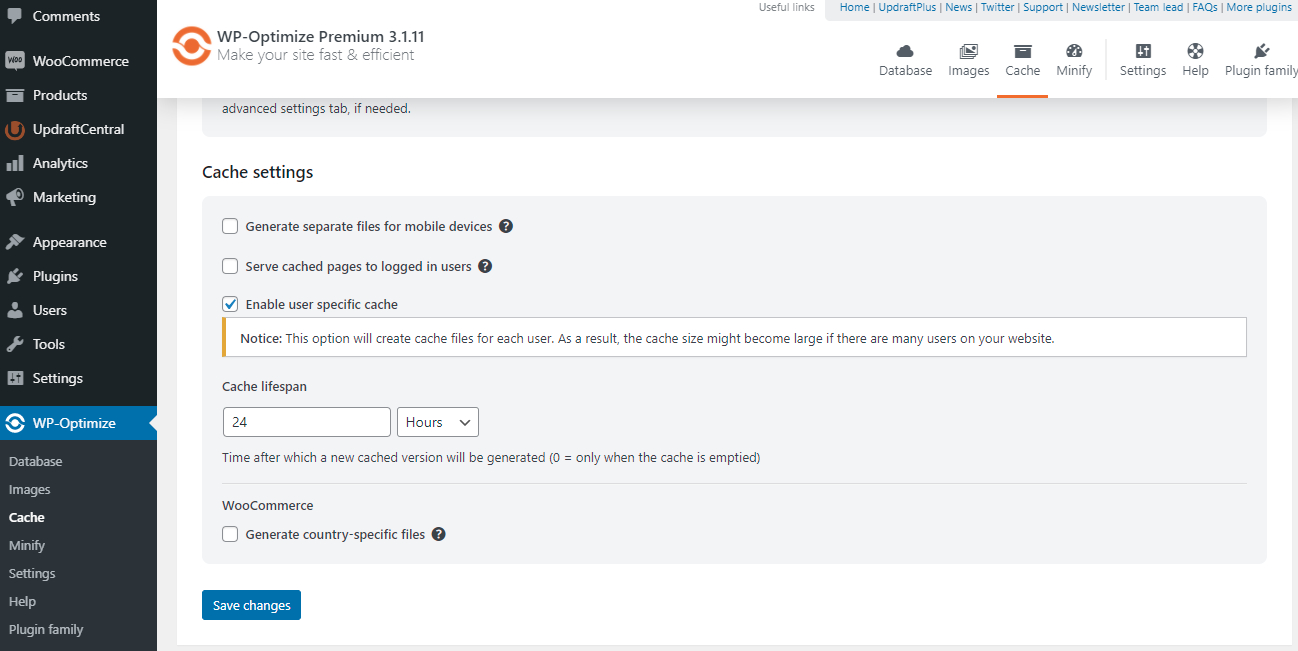
Premium users of WP-Optimize can now access a new feature called ‘user-specific cache’. When you activate the user-specific cache option, it allows you to cache specific content for individual users on your membership site, such as a partially completed online course.
How does it work?
If a user has logged into your site and purchased an online course for example, the main content of the site will only be available when logged in. When using user specific cache, the participants of the course will benefit from faster loading pages as the content has been cached to their account. If they were not logged in, this would not be the case.
Studies have shown that using this type of user-specific cache results in a much faster and better user experience, which in turn can potentially lead to further sales and interactions. Many websites that offer courses such as SkillShare and Udemy use this type of caching to help improve the user experience.
User specific cache can be turned on with just a tick of a box.
If you have a very popular site with many users, please be aware that this could result in a large amount of files, which could require a hosting package that can handle the extra demand.
When using WP-Optimize’s cache preloader feature, the user specific cache will not be created. But, the preloader will only cache the pages which non-logged in users see. The user specific content will be generated when the logged in user visits the pages (and they will see that cached page only when visiting that page again)
How to setup WP-Optimize. Once you have installed and activated the free version of WP-Optimize, you can learn how to set it up and for current and future use in just a minute or so. By setting up and carrying out these tasks, it can help your site to improve its speed and ranking score, as slow sites will suffer badly in search engine rankings if they are not routinely optimized.
Just follow the simple instructions in the below video to help continually optimize your site’s databases, images, caching and minify settings using the free version of WP-Optimize.
Recent Comments