
The 10 Fastest WordPress Themes in 2024
Whether you’re starting a new website, blog, or online store, if you’re relying on WordPress you need a fast theme. With thousands of WordPress themes to choose from, it is easy to be distracted by how a theme looks. This can cause problems when it comes to hitting acceptable page load times and looking good on mobile devices.
Fast WordPress themes that look good and are suitable for every use (even WooCommerce) are the answer.
But what is the fastest WordPress theme? To find out, we put some to the test.
Testing rationale: How we established the fastest WordPress themes
A fast WordPress theme can help your website fulfill Google’s basic page experience requirements. While website speed isn’t necessarily penalised, it is certainly a ranking factor. It makes sense to factor this in when developing a new web based project or reviving an existing one.
With so many “fast” and “light” WordPress themes to choose from, it can be difficult to make a decision. To make it easier, this list focuses on the top 10 of the 20 or so themes that claim to be the fastest.
Selection of these themes was based on certain criteria. They had to be described as being fast by their development teams, and found to be fast in other tests elsewhere online.
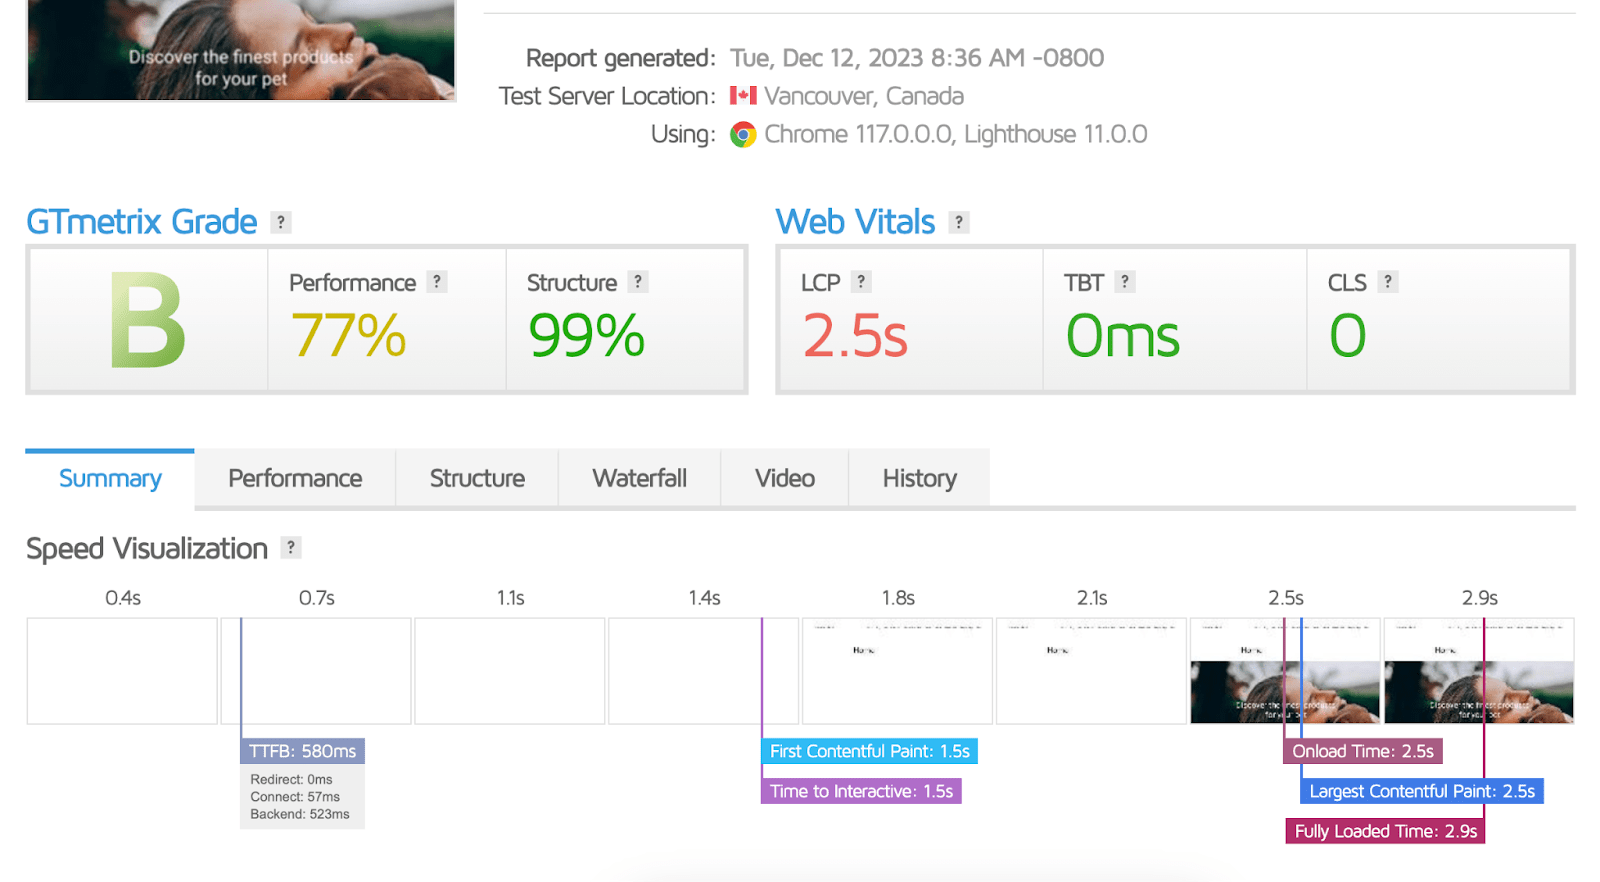
Our testing was conducted using webpagetest.org. This is an online tool that scans and reports loading times and factors. Testing took place on a dummy website, configured following each theme install to deliver a usable experience.
Original articles and stock images were used to populate the site. Both the homepage and a single post were tested for load times, but ranking is based on the homepage load time.
A few things to note about these theme selections. First, all but two of them are available directly from the WordPress themes index; in all cases, direct download links are provided.
Second, all of the tested themes are either free or have a free (“lite”) option.
Third, and finally, only themes that are actively maintained have been included in this top 10. (That is, they have been updated to ensure compatibility with the latest PHP version.)
While not a testing criteria, all of the themes we evaluated could be edited “live.” The older ones employ the WordPress Customizer tool, while the newer themes feature the Site Editor.
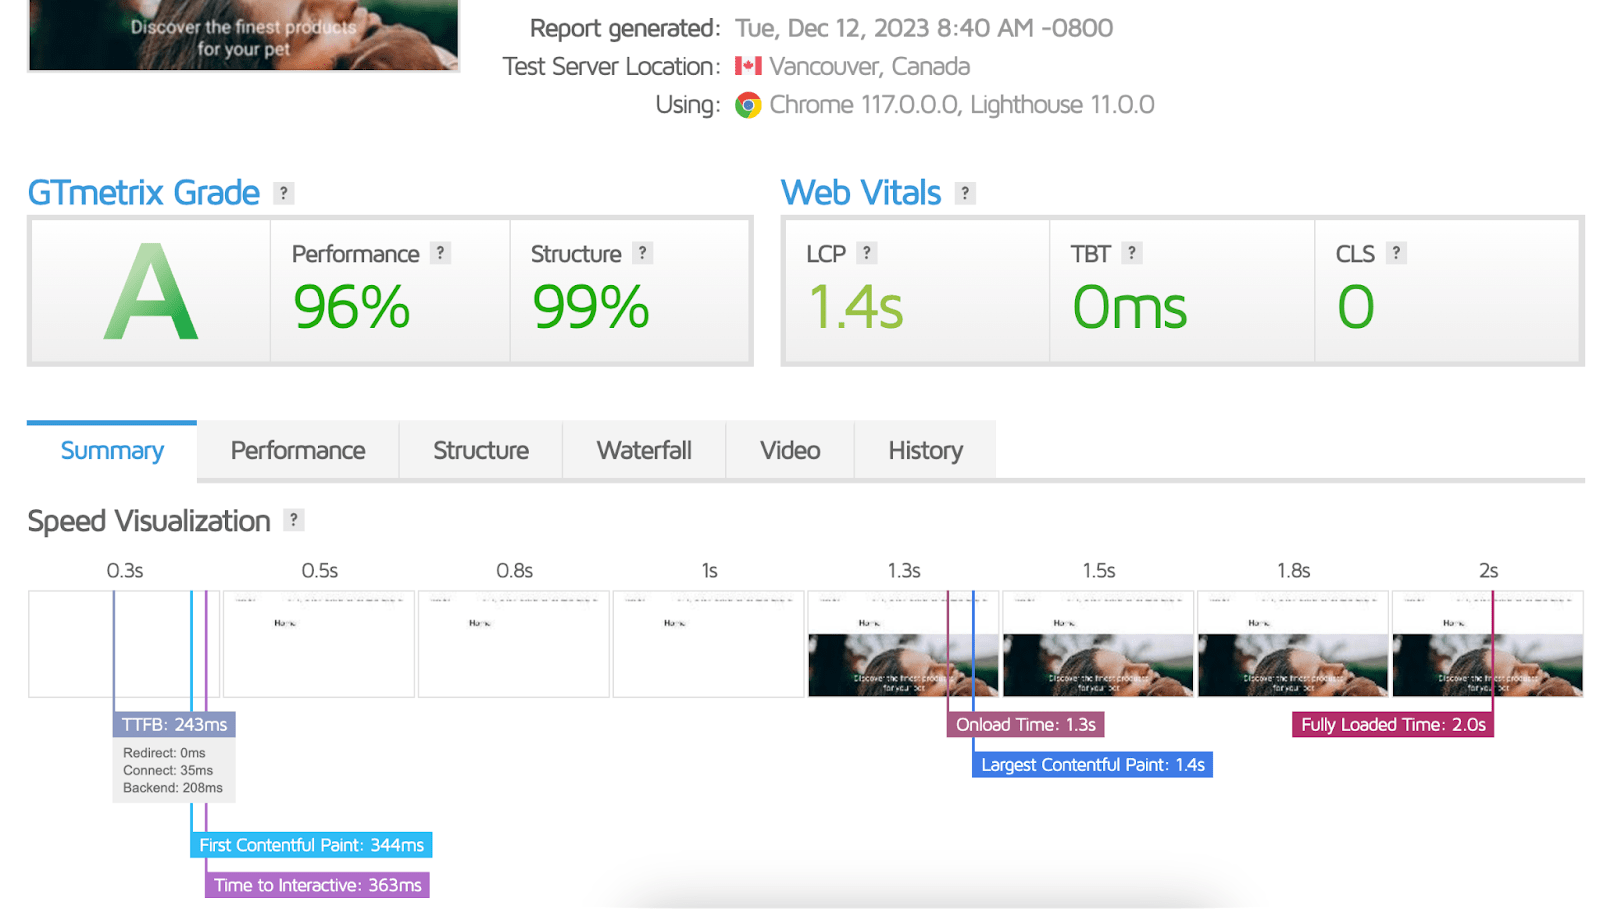
What do the testing measurements mean?
To test our selection of themes, we used www.webpagetest.org from Catchpoint. This testing solution has various advantages:
- It is remote, so local internet traffic or bandwidth issues can be discounted
- WebPageTest offers multiple tools and tests
- It assesses website loading times based on multiple factors
- WebPageTest also offers testing based on different browser and device profiles. (For example, mobile devices, desktops, specific browsers using mobile internet or cable, etc.)
The key testing measurements used for this assessment are:
- Speed index: The time taken for the page to be usable.
- Largest Contentful Paint (LCP): How long it takes for the largest visible element (image or video) to finish loading.
- Page weight: The size of the web page (in kilobytes) which includes HTML, CSS, JavaScript, and media.
The chosen testing profile was the default mobile device, Chrome browser, connecting over 4G. The test server was based in Virginia, US.
While various other factors are measured by WebPageTest’s Site performance option, the focus of this test is speed. Consequently, the criteria are those that directly impact speed and how a web page loads.
So, how did the themes compare?
1. The fastest theme for WordPress: Twenty Twenty-Two
Incredibly, the fastest-performing WordPress theme we found out of 25 tested was the default option from 2022. Twenty Twenty-Two was released as a pre-installed theme and is the first to be compatible with the site editor feature.
- Speed: 1.914 secs
- LCP: 2.019 secs
- Weight: 551 kb
While chunkier than some at 551 kilobytes, the speed and low LCP have given Twenty Twenty-Two the edge.
This is a flexible theme that is ideal for first blogs, portfolios, business sites, or single-page online presences. It is extremely configurable, with adjustable colours, typography, and customizable layouts.
However, there is a caveat. While we found this theme loads fastest for the homepage or index, it performed slower on single posts.
2. Taza
Released in 2023, Taza is a surprisingly nimble WordPress theme optimized for Google Core Web Vitals and Search Engines. While it has some elements that can be configured in the Customizer, the best way to style Taza is with the Site Editor.
- Speed: 2.031 secs
- LCP: 2.258 secs
- Weight: 170 kb
Not only is the theme quick, it is also quite lightweight, although the LCP timing is higher than we expected. With some built-in patterns and page templates, you can restyle this theme to suit most website purposes.
Taza’s single post loaded even faster, and ranked third in testing.
Do you want your site to be as performant as it can be?
WP-Optimize can make a notable difference in the page speed load time of your WordPress website.
3. Twenty Twenty-Three
Another default theme option developed by WordPress, Twenty Twenty-Three is surprisingly flexible. You might choose this theme for a magazine-like blog with ordered or masonry arrangement. Thanks to a number of style variations available in the Site Editor, Twenty Twenty-Three is suitable for most website purposes.
- Speed: 2.033 secs
- LCP: 2.051 secs
- Weight: 178 kb
Hitting the browser in just over 2 seconds, Twenty Twenty-Three is also quite light at 178 kilobytes. The LCP is also comparatively quick too. Similar results were experienced on a single page, although the weight for that test was just 75 kilobytes.
This is my preferred default WordPress theme, mainly because I found it straightforward to set it up.
4. Twenty Twenty-Four
While pretty heavy at 826 kilobytes, the Twenty Twenty-Four theme is another WordPress default that loads quickly. The theme has several style variation presets, a large collection of patterns and is configurable in the Site Editor.
- Speed: 2.033 secs
- LCP: 2.466 secs
- Weight: 826 kb
Also including a selection of page templates, this is a flexible theme that looks stylish and should suit most purposes. Note that blog post lists do not feature thumbnails, which may put you off.
If you’re more interested in faster post loading than index pages, Twenty Twenty-Four is worth checking out. Our testing found that this theme loaded quicker than any other when tested with a single post.
5. Go
Fifth fastest in testing is the aptly-named Go, which has the impressively compact weight of just 97 kilobytes. Produced by the GoDaddy web host, Go sports a selection of styles and colour schemes to suit any purpose. The theme can be edited in the Customizer, but note that there is no sidebar or widget support with Go.
- Speed: 2.041 secs
- LCP: 2.024 secs
- Weight: 97 kb
Despite this, stunning, rich themes can be created using the Go theme. It is also fast loading a single page or post, ranking sixth in that testing.
Go is not available via the WordPress theme installer, but curiously you can download it from the WordPress.org themes website.
6. Botiga
Some remarkable websites can be designed using Botiga. This makes it suitable for everything from blogs and portfolios to online stores. A minimal theme that can also be reconfigured with Elementor, Botiga is also suitable for use with WooCommerce.
With the Site Editor you can convert the default Botiga layout into something that truly represents your online project.
- Speed: 2.093 secs
- LCP: 2.026 secs
- Weight: 165 kb
Loading a single post in Botiga was even faster, with the WordPress theme ranking in fourth place. Unsurprisingly, this theme has generated a good reputation, with WordPress users rating it highly (4.9 out of 5).
7. Kadence
Personally speaking, Kadence is my favourite of all the fast WordPress themes I’ve tested. (In fact I have it set up on a staging site for testing on my own site.) With very little effort you can switch from the default settings to something tidy and impressive.
If this seems like too much effort, Kadence also comes with starter templates, although many of these are paywalled.
- Speed: 2.126 secs
- LCP: 1.992 secs
- Weight: 127 kb
With our test set up, Kadence loaded quick enough to come in seventh place. But it is the weight of the page, just 127 kb (154 kb for the single post), that really impressed me. Featuring the WordPress drag and drop header and footer builder, Kadence is easy to configure in the Customizer. Additionally, this theme is one of the fastest WordPress themes for WooCommerce installations.
8. Twenty Twenty-One
Another default WordPress theme option, Twenty Twenty-One suits blogs, portfolios, and business sites. But how fast is it?
Landing in eighth place, this theme can be restyled via the Customiser and includes eight patterns. Applying these in the right way can make your site look amazing.
- Speed: 2.216 secs
- LCP: 2.138 secs
- Weight: 467 kb
The “weight” of the homepage may seem concerning, but note that single pages are far lighter. Our testing on a single post with the Twenty Twenty-One theme applied loaded in 2 seconds, with the LCP at 1.994 seconds and a page of just 197 kilobytes.
9. Schema Lite
While a little blocky and arguably somewhat dated without revision via the Customizer (and some CSS), Schema Lite is fast.
While the LCP isn’t the fastest and it downloads more data to the homepage than other themes, it loads quickly. (However, we did find that Schema Lite was slower for single pages.)
- Speed: 2.261 secs
- LCP: 2.221 secs
- Weight: 472 kb
Schema Lite is one of only two themes we tested that isn’t available directly through the WordPress themes interface. Described as 100% responsive and SEO friendly, the Schema Lite theme can be downloaded from MyThemeShop. That’s where you’ll also find the Pro subscription version, which boasts various additional features, including an ad manager.
Setting this up, I did find some of the default typography options a little severe. As an older theme, this means revising the CSS, which might be off-putting.
Need more from Schema Lite? You can develop the theme with the Elementor tool.
10. Twenty Twenty
Despite being four years old, the Twenty Twenty theme still looks good and remains remarkably quick.
The curious thing about Twenty Twenty is that while it is relatively quick at loading the home page and individual posts, it weighs in at 750 kb.
- Speed: 2.267 secs
- LCP: 2.219 secs
- Weight: 750 kb
Twenty Twenty relies on the Customizer tool for design adjustments, and features five built-in patterns. These offer several options for styling the theme to suit your vision for your website.
If you find some WordPress themes difficult to configure, don’t worry. I found Twenty Twenty was simple to set up.
More fast WordPress themes
A total of 25 themes were tested for speed. Of these, one was dropped due to a lack of updates, and four were considered too slow by comparison.
While the fastest themes listed above have the advantage, you may also consider some slower themes. These might have faster LCP or be lighter than the fastest WordPress themes. Focusing on those factors may better suit your specific requirements.
The ten quick-loading themes that didn’t make the list are:
- Zakra
- Astra
- Generate Press
- Page Builder Framework
- Hello Elementor
- Customify
- Sydney
- Responsive
- OceanWP
- Hestia
See the appendix for the full rankings and timings.
Chosen a theme?
Optimize your database, compress images, cache and minify for more page speed improvements. 1 million WordPress website owners can’t be wrong.
FAQs
What is the fastest WordPress theme?
In our testing, we found that the Twenty Twenty-Two theme loaded the test site’s homepage quickest. But the Twenty Twenty-Four theme loaded a single blog post faster.
What is the lightest theme for WordPress?
Based on data size, the lightest theme is Go. The homepage for this theme is just 97 kilobytes. But the Astra theme shone with the lightest single post, weighing 66 kilobytes.
Why is my WordPress theme so slow?
Various factors can be attributed to slow WordPress themes. Unused plugins, poor caching and CDN use, and even poor web host support can contribute to a slow theme.
Also consider the possibility that your WordPress site has a security issue. Protecting the WordPress admin area will prevent this happening again.
How can I make my WordPress site faster?
Start by finding out what is making your site slower. Rule out (by disabling) plugins, and revert the site to a default theme. If things improve, enable plugins and the preferred theme one at a time. But you should also consult your web host. For example, your server’s PHP version might be out of date.
If all that seems too complicated, a WordPress optimisation plugin can help.
Appendix
Recorded times for testing the WordPress theme speed on the homepage/index.
| THEME | SPEED (sec) | LCP (sec) | WEIGHT (kb) |
| Twenty Twenty-Two | 1.914 | 2.019 | 551 |
| Taza | 2.031 | 2.258 | 170 |
| Twenty Twenty-Three | 2.033 | 2.051 | 178 |
| Twenty Twenty-Four | 2.033 | 2.466 | 826 |
| Go | 2.041 | 2.024 | 97 |
| Botiga | 2.093 | 2.026 | 165 |
| Kadence | 2.126 | 1.992 | 127 |
| Twenty Twenty One | 2.216 | 2.138 | 467 |
| Schema Lite | 2.261 | 2.211 | 472 |
| Twenty Twenty | 2.267 | 2.219 | 750 |
| Zakra | 2.29 | 2.227 | 388 |
| Astra | 2.322 | 2.241 | 162 |
| Generate Press | 2.326 | 2.134 | 284 |
| Page Builder Framework | 2.375 | 2.315 | 543 |
| Hello Elementor | 2.383 | 2.327 | 358 |
| Customify | 2.463 | 2.408 | 316 |
| Sydney | 2.475 | 2.193 | 175 |
| Responsive | 2.492 | 2.254 | 322 |
| OceanWP | 2.667 | 2.618 | 524 |
| Hestia | 2.883 | 3.025 | 547 |
| Ovation | 2.89 | 2.478 | 439 |
| Popular FX | 2.901 | 2.886 | 594 |
| Neve | 3.17 | 3.057 | 175 |
| Blank Canvas | 3.2 | 3.231 | 220 |
Recorded times for testing single posts with each WordPress theme.
| THEME | SPEED (sec) | LCP (sec) | WEIGHT (kb) |
| Twenty Twenty-Four | 1.748 | 1.877 | 534 |
| Kadence | 1.834 | 1.776 | 154 |
| Taza | 1.842 | 2.336 | 122 |
| Botiga | 1.992 | 1.854 | 101 |
| Twenty Twenty-One | 2 | 1.994 | 197 |
| Go | 2.045 | 1.993 | 114 |
| Twenty Twenty-Three | 2.078 | 2.012 | 75 |
| Twenty Twenty-Two | 2.084 | 1.877 | 487 |
| Responsive | 2.104 | 2.078 | 247 |
| Zakra | 2.121 | 2.145 | 145 |
| Page Builder Framework | 2.148 | 2.059 | 332 |
| Generate Press | 2.152 | 2.118 | 226 |
| Astra | 2.171 | 2.026 | 66 |
| Hello Elementor | 2.3 | 2.261 | 109 |
| Blank Canvas | 2.3 | 2.297 | 128 |
| Ovation | 2.317 | 2.3 | 332 |
| Popular FX | 2.348 | 2.317 | 358 |
| OceanWP | 2.359 | 2.247 | 458 |
| Customify | 2.391 | 2.322 | 207 |
| Neve | 2.51 | 2.62 | 125 |
| Twenty Twenty | 2.526 | 2.29 | 513 |
| Schema Lite | 2.532 | 2.459 | 327 |
| Sydney | 2.573 | 2.149 | 235 |
| Hestia | 2.883 | 3.025 | 547 |
We're rated 5 stars on the WP plugin directory
Get our all-in-one WordPress performance plugin to turbo-boost the speed of your WordPress website.
")


Recent Comments