by Wayne Mullins | Dec 1, 2021 | WP Optimize, WP-Optimise
The latest update for WP-Optimize 3.2.1 has now been released. As you can see from the list below we have been hard at work making changes, and as such – this latest update comes with a huge number of tweaks and fixes. As part of the new update, we have made changes so that WP-Optimize helps improve the performance and user experience in some very important areas of your WordPress site, including caching, image compression and minifying.
Try out he new and updated version of WP-Optimize today and see the difference.
- FIX: Apply different image compression levels
- FIX: Cache – Purge WooCommerce product page after stock update
- FIX: Database errors after adding a new site
- FIX: Flatsome theme compatibility with google fonts
- FIX: Image compression advanced settings, display default backup days instead of empty value.
- FIX: Image compression was not working when the image extension used capital letters
- FIX: Premium – Cache – Potential PHP error in User-specific cache
- FIX: Premium – resolve potential admin-area PHP error if the deprecated mailchimp sync plugin and MC4WP plugin are both active (and potentially other situations where a plugin deactivates another)
- FIX: Premium – Unused images – compatibility with PHP 8
- FIX: Premium – Unused images – issue with parenthesis in name
- FIX: Premium – Unused images – Pagination count doesn’t update
- FIX: Prevent a PHP notice when using with UpdraftCentral
- FIX: Save prioritize maximum compression setting correctly
- FIX: Wrong redirect when wiping settings on multisite
- TWEAK: Premium – add review link at bottom of settings
- TWEAK: Force monolog/monolog and psr/log versions to retain PHP 5.X compatibility/satisfy wordpress.org SVN hooks
- TWEAK: Add compatibility with Kinsta
- TWEAK: Added functionality for to convert MyISAM to InnoDB
- TWEAK: Add filters for minify input string
- TWEAK: Cache – Added filter to modify cache exception urls
- TWEAK: Cache – Optimize preload from sitemap
- TWEAK: Cache – Serve different versions based on cookie consent
- TWEAK: changed filter to prevent deprecation notice in php 8.1+
- TWEAK: Decide automatically whether to inline css or not based on file size
- TWEAK: Fix typo in text domain name
- TWEAK: get_hurl function minified.
- TWEAK: Improve clarity of debug message when DONOTCACHEPAGE constant is used
- TWEAK: Improve DB UI/UX on multisite
- TWEAK: Improve minify cache size messages
- TWEAK: Making Estatik plugin compatible
- TWEAK: Minify – Add JS translations support
- TWEAK: Minify HTML only on cache pre-loading
- TWEAK: Port from previous semaphore classes to Updraft_Semaphore_3_0
- TWEAK: Premium – Unused images – Show that there are images in the trash without having to re-scan everything
- TWEAK: Prevent a PHP notice when downloading image compression log file. Fix backup modal styling issue.
- TWEAK: Prevent fatal error in gzip settings when stylesheet could not be fetched
- TWEAK: Short-circuit trivial case of nothing in the buffer when page-caching, to involve any possible other issues
- TWEAK: Update comments count after trackbacks and pingbacks deletion
- TWEAK: Update minified asset when the enqueued scripts and styles version change
- TWEAK: Use proper constant of includes path in user cache extension
by Wayne Mullins | Feb 16, 2021 | WP Optimize, WP-Optimise
The latest updates for WP-Optimize 3.1.7 have now been released – including the preload key request feature. We have taken a lot of time and effort to launch these new improvements and hope that they further help improve users’ experience of WP-Optimize.
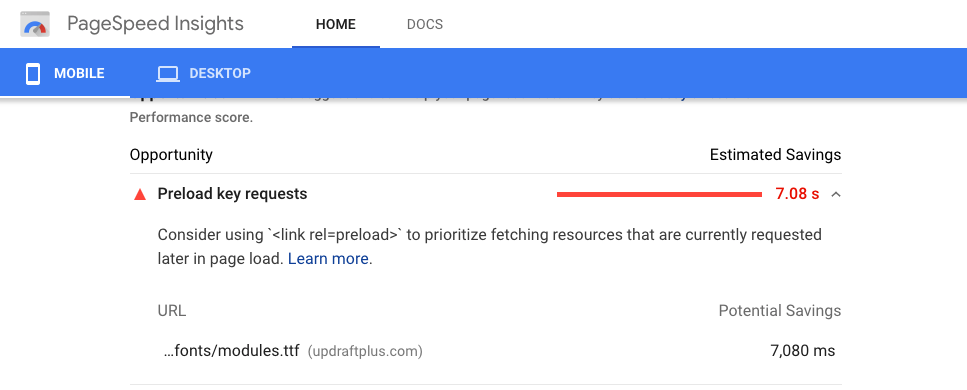
When aiming to improve the speed of your WordPress site using WP-Optimize, one of the new features we have released with this update is the ability to preload key requests. Preload key works by using an audit to identify which resources to preload on your WordPress site. The browser will then preload resources so they are available immediately when needed, preventing eventual waiting time later on, making your site load faster. Google’s pagespeed insights will often suggest preloading the requests to font files and other assets as a speed improvement:
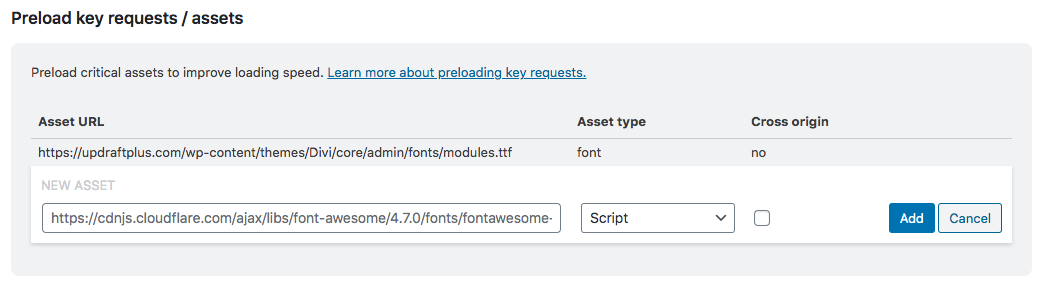
With the latest WP-Optimize Premium release, you now have the ability to manually add any resource you want to be preloaded:
As can be seen in the Google PageSpeed insight test, preloading key requests can result in massive time savings when visitors are loading your site.
In order to get the URL to add to WP-Optimize, just right click on the resource and copy the URL:

Next, past the URL in the ‘New Asset’ box of the ‘Preload key requests / assets’ section of WP-Optimize and press ‘Add’.
The URL you added you will be added to your preload key requests.
The updates to WP-Optimize 3.1.7 also includes the following:
WP-Optimize: 3.1.7
- FEATURE: Premium – Preload key requests (Preload fonts and other assets)
- FIX: Detecting Brotli compression issue
- FIX: Cache – PHP Warning in URLs to exclude from caching
- FIX: Premium – Unused images – Unused Images Tool not recognising Greek characters
- FIX: Button for disabling Gzip doesn’t showing
- TWEAK: Database optimization – Prevent fatal error due to files missing
- TWEAK: Skip minify when SCRIPT_DEBUG is set to true
- TWEAK: Fixed Font-awesome settings
- TWEAK: Add support for different spellings of “Font-awesome”
- TWEAK: Update the feature comparison table
- TWEAK: Added the option to not show the warning before deleting a table
- TWEAK: Wipe all options upon plugin de-installation
- TWEAK: Premium – Lazy-load – Lazy load support for background images
- TWEAK: Minify – Add file size in the minify cache summary
- TWEAK: Detect conflicting plugins for GZIP issue
- TWEAK: Database optimization – Include all tables if database prefix is not set on WP install
- TWEAK: Premium – Unused images – added “X of X images loaded” for unused trash images
- TWEAK: Don’t allow to remove actionscheduler_ tables
- TWEAK: Premium – Unused images – Show a progression screen when doing any action with unused images
- TWEAK: Cache – Enable cache for the old default permalink structure domain.com/index.php/a-post-name by creating a folder without the extension
- TWEAK: Show previous action as message on Trackbacks or Comments enable or disable.
- TWEAK: Prevent deprecation notice on PHP 8.0
- TWEAK: Update notices
by wpoadmin | Apr 9, 2019 | WP Optimize, WP-Optimise
This blog will help you understand what kind of results and savings you can expect to achieve with ‘Lossy’ and ‘Lossless’ compression methods.
Lossy Compression
The most popular image compression for most users is Lossy, which can be categorized as achieving greater space saving (compared to lossless), whilst losing some of the data and image quality from the original image as a result of the compression process.
While you can save more data with lossy, the data saving isn’t completely without cost, as with increased compression comes a slight degradation in the image quality.
The image will still be very high quality and present as a professional and clear image, but you may start to get some compression artefacts appear with high levels of compression.
With Lossy compression enabled, the below image was compressed from 230.26 KB to 64.92 KB, giving an almost 75% reduction in size.

Original JPEG image (above)

How image looks converted with lossy compression (above)

Original image zoomed in 300% (above)

Lossy image zoomed in 300% – 230.26 KB to 64.92 KB, a 75% reduction in size (above)
Lossy Summary
Pro – Can reduce the images to small sizes and save lots of file data, making your website load quicker and perform better.
Con – The smaller you make the file size, the lower the quality of your original image.
Lossless Compression

Lossless compression differs to lossy by maintaining the original image quality, while reducing the image data size by removing unnecessary meta-data from the submitted files (usually JPEG or PNG files). Whilst the amount of space you will save is not as much as lossy compression, it does give you a higher quality image.
With Lossless compression enabled, the below image was compressed from 230.26 KB to 172.18 KB, giving just over 25% reduction in size.
Original JPEG image (above)

Converted with Lossless compression. Every pixel is identical to the original image – only the file size is smaller (above)
Original image zoomed in 300% (above)

Lossless image zoomed in 300% – 230.26 KB to 172.18 KB, a 25% reduction in size (above)
Lossless Summary
Pro – Decreases image file size but maintains original quality of image.
Con – Using Lossless compression results in larger files sizes in comparison to lossy compression, which can result in slower loading speeds.
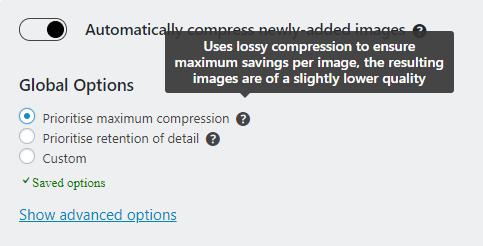
Custom
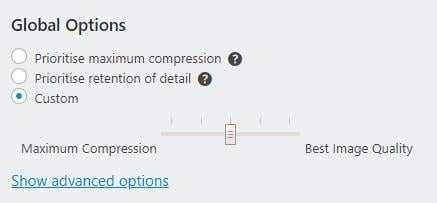
We understand that some users may wish to decide their own balance between maximum compression and best image quality. With the custom option, you can manually choose which settings your prefer for image compression and save them for future use.
Restore with WP-Optimize
WP-Optimize gives you the option to backup your images before compressing them, which you can do from within the WP-Optimize plugin or from the WordPress media library. To restore an image to its original state, click ‘Show advanced options’ in the ‘Compress images’ tab and click ‘Restore all compressed images’.

Overall Compression Summary
Making a choice between lossless or lossy compression depends on what you want to achieve and what works best for your site and users. In general terms, if you have a website that needs to showcase high quality photographs (such as a wedding photography business), you should stick to lossless compression as it will still display your images in their original highest quality. But if your site is for a local garage for example, where the highest quality images are not so important, lossy compression could work best as original high quality photos are not essential to the success of your business.
by wpoadmin | Mar 13, 2019 | WP Optimize, WP-Optimise
We are pleased to announce that we have released an updated version of WP-Optimize 2.2.13 for both free and paid versions.
The latest update includes a few fixes and tweaks that we hope will make your WP-Optimize experience even better.
We recommend the update for all WP-Optimize users.
The full changelog is as follows;
- FIX: Fixed RTL layout
- FIX: Detect more relationships between tables and plugins in orphaned database tables optimization
- FIX: Fixed orphaned relationships optimization
- TWEAK: The informational list of WP core tables missed some possible extra tables on multisite
The post WP-Optimize 2.2.13 new update released appeared first on UpdraftPlus. UpdraftPlus – Backup, restore and migration plugin for WordPress.
by wpoadmin | Mar 8, 2019 | WP Optimize, WP-Optimise
Page Speed is the foundation to a great online shopping experience. Of course an excellent user experience with an eye-catching store is essential, but page speed is the most crucial benchmark for any WooCommerce website. Just a one second delay can result in the user deciding they have had a bad user experience and create a loss of trust in the brand, which can lead to abandoned carts and increased bounce rates. This results in not just a potential loss of a sale, but far more importantly, a dissatisfied customer.
When queried on how long it should take a site to load, 47% of customers expect a load time of around 2 seconds. When it comes to WooCommerce, the chances of slower page speed is higher as there is a constant influx of new, updated products and categories being processed. While these updates are happening in the background, your database and server space is continually increasing, which can slow down your site.
At the time of writing this article, the WP-Optimize free version plugin has more than 800,000 active installations. There is also a premium version available that includes additional features and tools for optimizing your website and WooCommerce store. We are continually working hard to make the plugin better and help solve real-world problems our users are facing in terms of site optimization.
Why you should optimize your WooCommerce store
As time passes, your WordPress database can become unwieldy due to the garbage data it accumulates with each passing day. WP-Optimize removes this useless data, freeing up valuable megabytes while also increasing speed and efficiency. This plugin can also clean up your comments table, removing all the spam and un-approved comments that have built up – with just with a single click.
WP-Optimize also gives you the option to use lazy loading for your WooCommerce store. Lazy loading is a function that allows your site to only load parts of a web-page when they are visible to the user, which results in faster loading pages. This allows the user to instantly start viewing the visible sections of the site, rather than wait for all the images and information on the page to load.
Please note: It is highly recommended you first perform a backup of your site and WooCommerce store with UpdraftPlus before you start setting up the optimization process.
How to optimize your WooCommerce Store with WP-Optimize
To get started, get your copy of WP-Optimize and install it on your WordPress site.
Next, head over to the WP-Optimize>Settings page. Under ‘Database’ you will see pre-selected options for optimization. Keep all pre-selected options as they are and click the ‘Run all selected optimizations’ button.
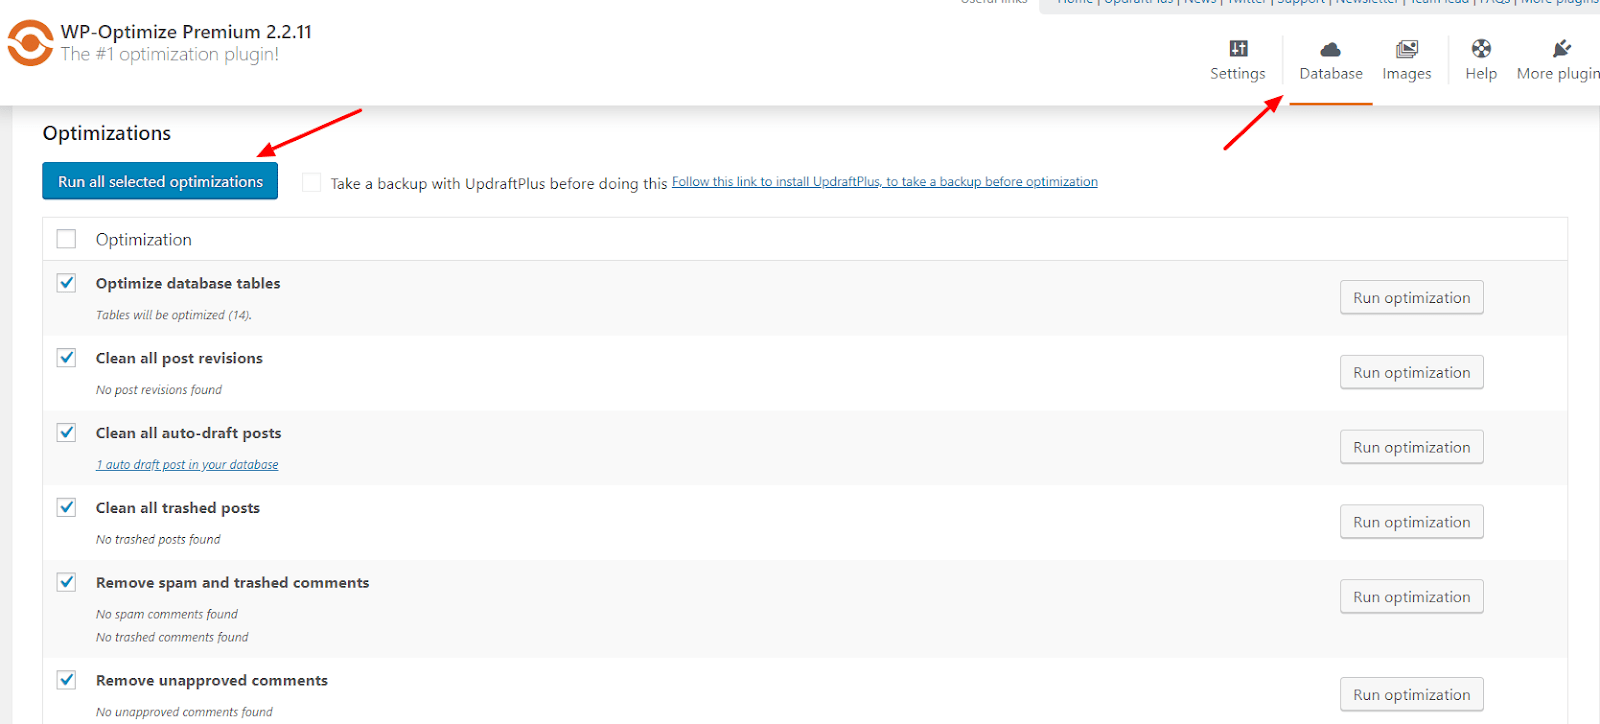
If you would prefer to run each optimization separately, WP-Optimize also provides a ‘Run optimization’ button next to each option.
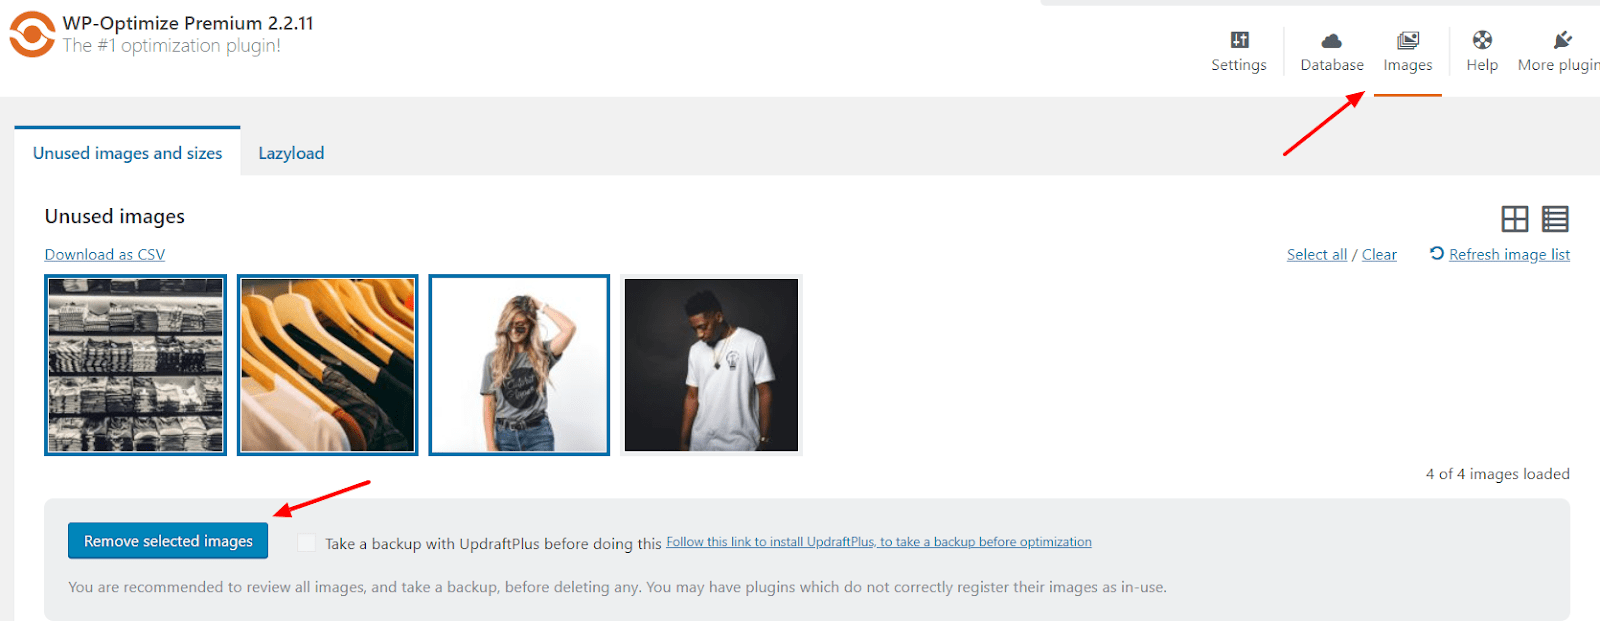
Next, under the ‘Images’ section, you will see the orphaned image list ‘Unused images’. If you do not plan to use these orphaned images, then deleting them can save you valuable server space. To delete them, just select the images you wish to delete and hit the ‘Remove selected images’ button.
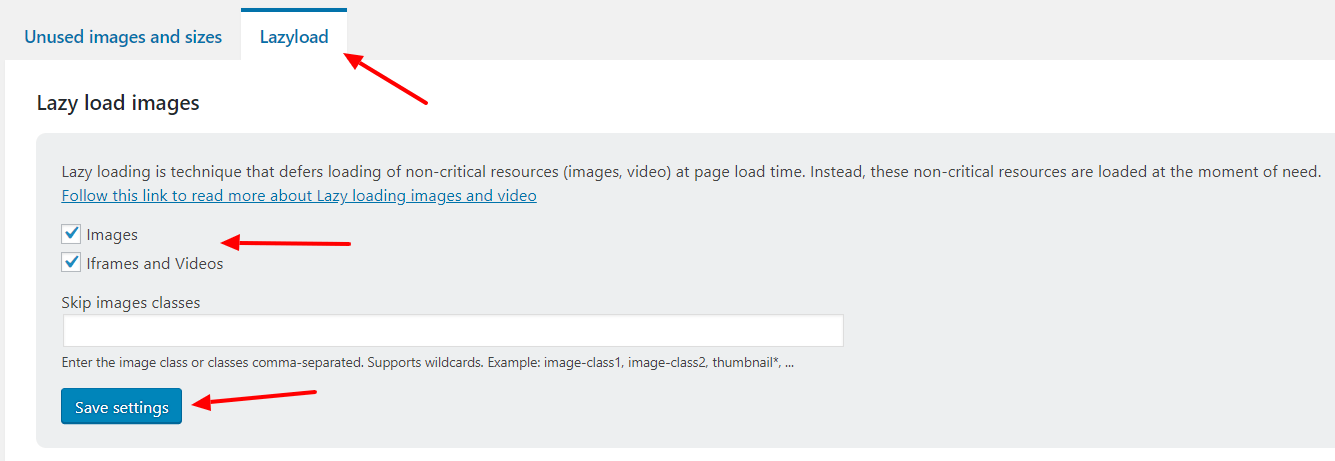
The final feature we recommend using is the previously mentioned ‘Lazyload’ feature, which can help you speed up your WooCommerce store. To enable this setting, click on the ‘Lazyload’ tab and tick both ‘Images’ and ‘Iframes and Videos.’
Conclusion
Speeding up your website can help your customers save time by making their purchases quicker and easier, resulting in happy customers that are more likely to return in the future and recommend your site to others. Try out the techniques techniques discussed and be sure to let us know how you get on in the comment section below.
by wpoadmin | Feb 8, 2019 | WP Optimize, WP-Optimise
We are pleased to announce that we have released an updated version of WP-Optimize 2.2.12 for both free and paid versions.
We recommend the update for all WP-Optimize users.
The full changelog is as follows;
- TWEAK: Updated information on More plugins tab
- TWEAK: Fix header layout when a system or third party notification are shown
- TWEAK: (Premium) Fix layout in unused images list mode
- TWEAK: Improve data reliability in javascript
- TWEAK: Improve orphaned relationships data optimization
- TWEAK: Wrong message for “remove spam and trashed comments” optimization
- TWEAK: Output additional information if table was not deleted
- FIX: Added escaping for table names in database queries
- FIX: Fix another possible fatal error due to missing get_plugins() function
- FIX: Improve identification of installed/active plugins
The post WP-Optimize 2.2.12 now released appeared first on UpdraftPlus. UpdraftPlus – Backup, restore and migration plugin for WordPress.
Recent Comments